Create WordPress backup with WPvivid Backup - migration, backup, staging
WordPress backups are constantly needed when you want to make cardinal changes on your website or want to migrate your website to another domain. WPvivid Backup WordPress plugin makes backup and website migration easy.
If you have done a lot on your website, uploaded over 1,000 images and manage several hundred URLs, it would be particularly annoying if the design or functionality crashes after a WordPress or plugin update. The same applies to the application of cardinal changes, such as certain code compression or rewriting the code of certain plugins. You might also want to use a WordPress plugin like Smush to automatically resize your website images for load time optimization, but don’t know if 1,000 website images might backfire.
In all of these cases, you should have a backup of your WordPress website and website database. In addition, it makes sense to back up websites at regular intervals so that older versions can be restored if desired or to protect against malware or hacker attacks. The latter can already happen if you have a PDF upload function on your website and a bot manages to smuggle malware onto your website. In this case, your hoster should automatically block the website until you fix the compromised website. In this case it is very good if you have a ready-to-go backup ready to delete the compromised website and restore the backup.
Instructions: Create a WordPress backup with WPvivid - migration, backup, staging
There are many ways to create WordPress backups. It is particularly easy and practical with the WordPress plugin WPvivid – in just a few clicks: This is a free, high-performance application for backing up your database and your WordPress website, so that you can save the corresponding backup files on another or cleaned WordPress website with the same one , installed plugin. Also very advantageous: In the free version, the WPvivid has no limitation in terms of the file size for which you can create a backup. You can use WPvivid to create backup files and upload them to any WordPress site that also has WPvivid installed. The current website version is completely overwritten by the backup version. The complete backup version is seamlessly installed without errors.
Step 1: Install WordPress plugin WPvivid for WordPress backups
First, install the free WordPress plugin WPvivid Migration, Backup, Staging to create a full WordPress backup for your WordPress website. Don’t worry: the plugin does not change the functionality or the design of your WordPress website and does not make any changes or backups on its own. Nothing happens by the mere installation.
Step 2: Start WordPress backup with WPvivid
Once WPvivid is installed and activated, go to the WordPress dashboard and click on WPvivid in the left menu bar. In the main window you will directly see the Backup and Restore page. Select backup function “Database + files (WordPress files)”, as well as the item “Save backups locally”, so that the backup can be downloaded directly in the WordPress dashboard. Then click on the blue “Back up now” button.
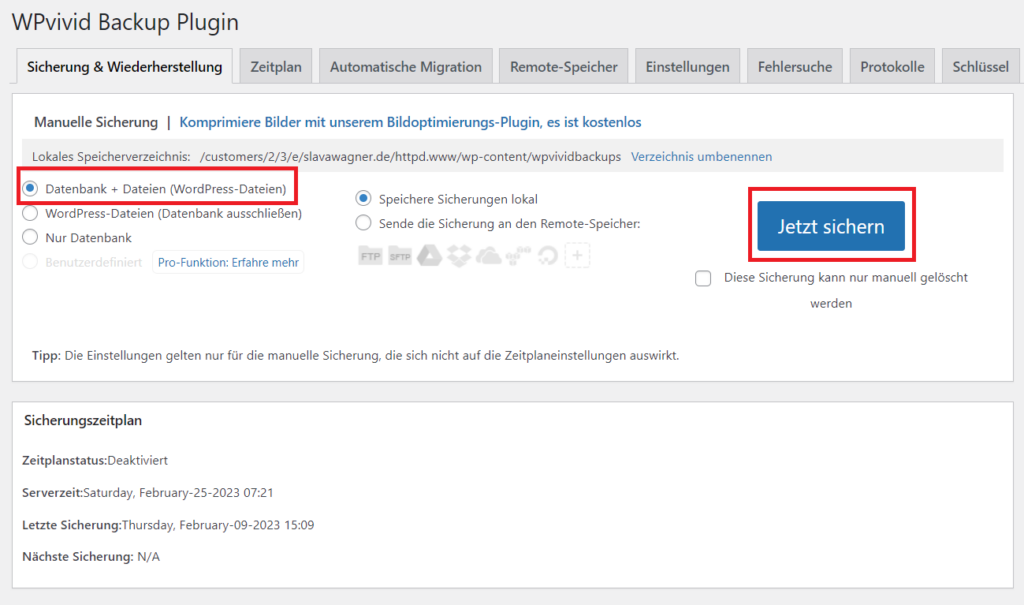
Create backup files for your WordPress backup with WPvivid and back up your database and WordPress files.
Step 3 - Download WordPress backup with WPvivid
Backing up the backup with the files from the database and from the WordPress website will now take a while. Once the backup process is complete, you can scroll down in the same main WPvivid window and you will see your backup in the Backups menu tab. Click the “Download” button to download your created WordPress backup.
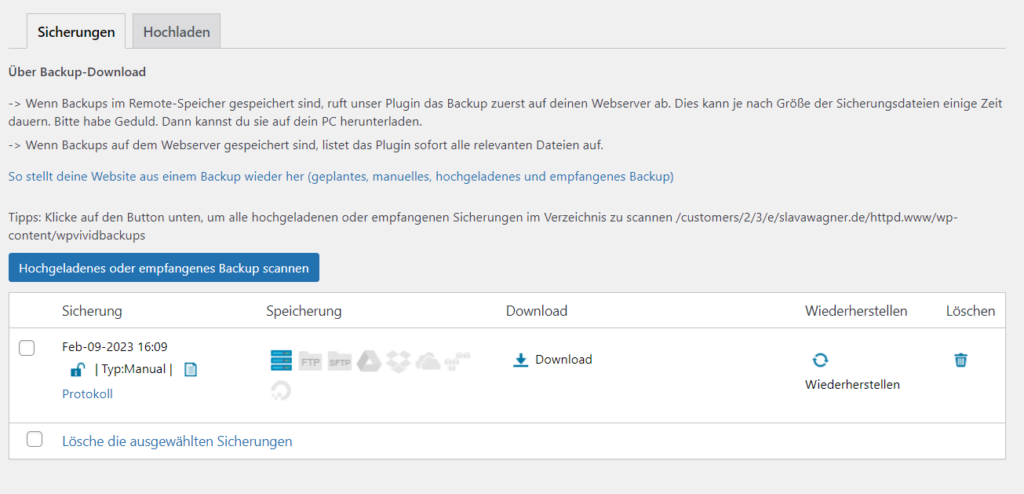
In the WPvivid dashboard, click on the download button under “Backups” to download your backup files for the WordPress backup.
Now you will see your complete WordPress website with all database files for download. WPvivid splits the backup into several numbered file packages in ZIP format so as not to overload the server with too much data. Now download all ZIP file packages.
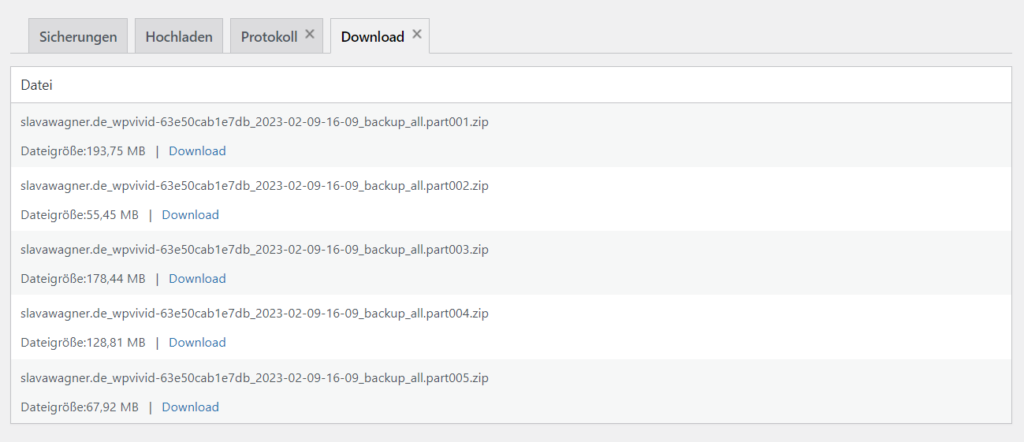
Now download the numbered backup files for your WordPress backup from WPvivid. You can easily upload this again later to restore an older WordPress website version or to upload it to another WordPress website (migration).
Step 4 - Upload WordPress backup to WPvivid for recovery
If you now want to restore your WordPress backup as a website or import it into another WordPress website (migration), you only need to have the WordPress plugin WPvivid installed and you can upload your ZIP file packages using drag-and-drop. The function for uploading your backup file packages is in WPvivid in the main window at the bottom under the “Upload” menu tab. Drag and drop your WordPress backup ZIP file packages into the “Drop files here” field.
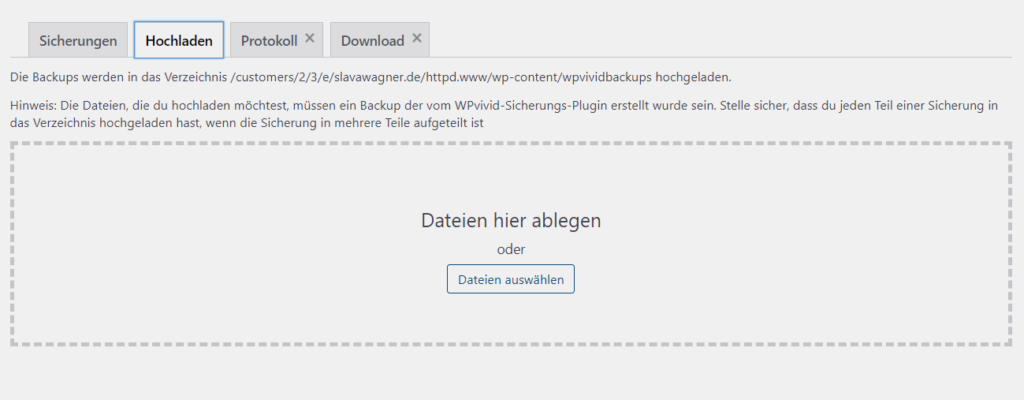
In the “Upload” menu tab at the bottom of the WPvivid dashboard, you can re-upload your previously downloaded backup files in ZIP format of your WordPress backup to restore the old website version.
Step 5 - Initiate WordPress backup restore with WPvivid
Then go back to the “Backups” menu tab. If you want to restore a saved WordPress backup. To do this, simply click on the “Restore” button to the right of the relevant WordPress backup. Warning: WPvivid deletes archived WordPress backups after a long period of time to save storage space. You should therefore download the backups as described above . Alternatively: Click on the lock symbol in the backup file so that the WordPress backup that is online can only be deleted manually if you want to reactivate it directly from your WordPress dashboard without uploading it again.
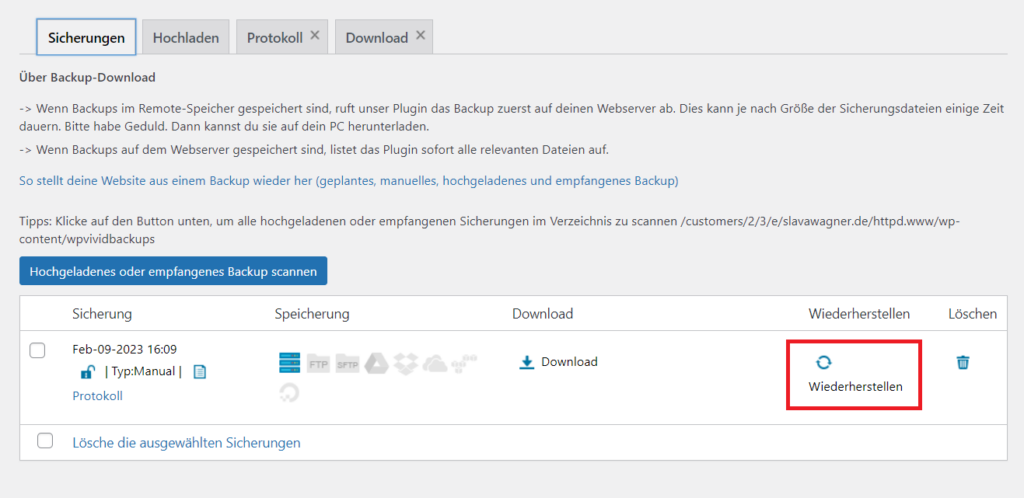
In the WPvivid dashboard under “Backups” in the saved WordPress backup row, click Restore to restore a specific website version.
Step 6 - Important: Increase PHP memory limit for backup data volume
Now there is one more important setting you can make if your website size does not allow a backup: Increase the default PHP memory limit for backup and restore of your WordPress backup in the settings.
This is easy to do if you go to the WordPress dashboard, navigate to “WPvivid Backup” in the left menu bar and click on “Settings” in the submenu. Then go to the “Advanced Settings” tab in the main window, scroll down and enter 1024 MB for “PHP memory limit for backup” and for “PHP memory limit for restore”. Then click on the blue button below “Save changes”.
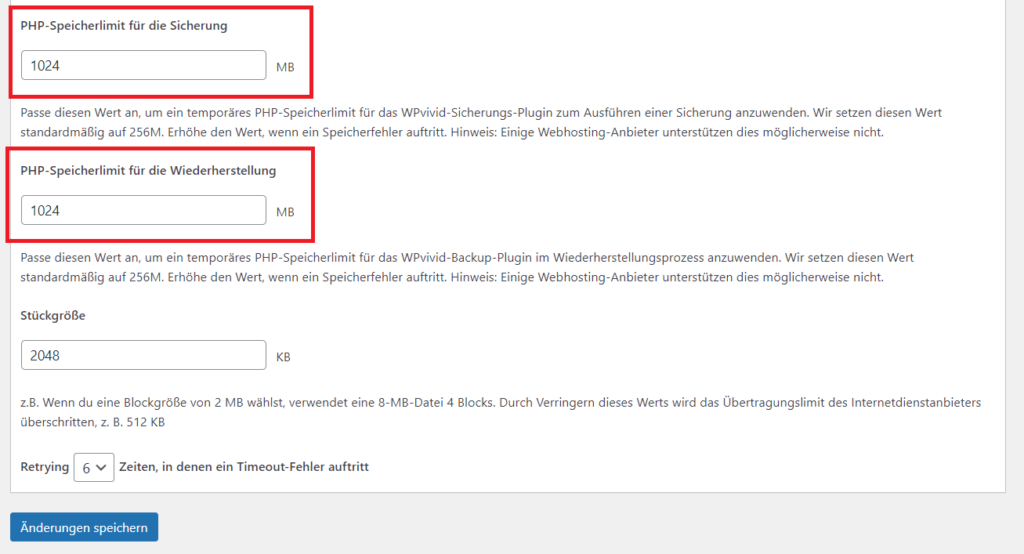
Increase the PHP storage limit on WPvivid so you can create larger WordPress backups. Otherwise the system will not be able to perform your backup if you have reached a certain website size.
Conclusion: Create a WordPress backup with WPvivid with just a few clicks
With the WordPress plugin WPvivid you can create WordPress backups in just a few clicks – safely and reliably. You can download the backup files for the backups at any time and either upload and restore to your existing site or upload and import to another WordPress site if you are planning a site migration.
Create a WordPress backup with WPvivid
If you have any questions regarding WordPress backups with WPvivid, feel free to ask:
Ask your question
info@slavawagner.de
Overview
- Instructions: Create a WordPress backup with WPvivid - migration, backup, staging
- Step 1: Install WordPress plugin WPvivid for WordPress backups
- Step 2: Start WordPress backup with WPvivid
- Step 3 - Download WordPress backup with WPvivid
- Step 4 - Upload WordPress backup to WPvivid for recovery
- Step 5 - Initiate WordPress backup restore with WPvivid
- Step 6 - Important: Increase PHP memory limit for backup data volume
- Conclusion: Create a WordPress backup with WPvivid with just a few clicks
How can you create a WordPress backup with WPvivid?
- Install the free WordPress plugin WPvivid Migration, Backup, Staging .
- Create a backup in the dashboard of WPvivid with the backup of your WordPress websites and your database.
- Download Backup: Download the numbered ZIP file packs from WPvivid.
- Upload backup and restore old WordPress website or migrate to another WordPress website : In the WPvivid menu tab “Upload” you can upload the ZIP file packages of your backup again and restore them under “Backups”.
Ask your question
info@slavawagner.de
Overview: Create a WordPress backup with WPvivid in just a few clicks
With the WordPress plugin “WPvivid Backup – Migration, Backup, Staging” WordPress users can create backups of their website quickly and easily. The plugin offers an intuitive interface that allows users to create full or partial backups of their website in just a few clicks. Users can also set the backup frequency and create scheduled backups. The plugin also provides an automatic backup restore feature that allows users to restore their website to an earlier point in time with just one click. In addition, users can also migrate their backups to other servers or hosting platforms. The plugin’s features also include the creation of staging sites that allow users to test their website offline and make changes before going live. WPvivid Backup is a powerful and easy-to-use WordPress backup, migration and staging tool that ensures the security and reliability of WordPress websites.
FAQ - Summary of WordPress backup with WPvivid
Here is a summary of important and frequently asked questions about WordPress backup with WPvivid:
To create a WordPress backup using the WPvivid Backup plugin, you should first install and activate the plugin. Then click on the WPvivid plugin in the left sidebar of the WordPress dashboard and first create a backup of your WordPress website and database. The process will take some time. You can then either leave the completed backup on your website to restore it later, or download it to save it locally.
If your WordPress website is a bit larger, the default configured PHP memory limit for WordPress backups with WPvivid is often not enough. Therefore, increase your PHP memory limit to 1,024 MB in the WPvivid settings so that you can also create a backup with WPvivid for larger WordPress websites.
Just go to the WordPress dashboard and click on WPvivid in the left menu bar. Here you can either upload an old backup version that you have already saved or one of your downloaded backup files in ZIP format. Then click on the “Restore” button. Attention: Your existing website will be completely overwritten.
If you run a website with WordPress, it is important to make regular backups. A backup is a copy of your website and database that can be used to restore your website in the event of an outage or malware attack. The WordPress plugin “WPvivid Backup – Migration, Backup, Staging” is a reliable tool that will help you make automatic backups of your website and save and restore them in an easy way. With this plugin, you can focus on growing your website while knowing that your data is always safe.
You might also be interested in:
Schema markups for FAQ questions: More clicks from organic Google search
To have a chance get into the related questions section at the top of Google Search, you can set up your answered questions with FAQ schema markup.
How to install the AMP integration on WordPress websites according to GDPR
With the AMP integration you can get up to 25% more organic impressions in search engines on your website.