Installing Matomo on WordPress websites: Beginner's guide for the most important functions in server-side tracking

With server-side tracking from Matomo you can analyze the full depth of your website traffic because you do not need consent in the cookie banner – because there is no third-party data retrieval and only you have access to the measurement results.
Matomo is becoming more and more important because since the introduction of the GDPR, website tracking with Google Analytics has become increasingly problematic. Because according to the GDPR, a website user must explicitly agree to third-party data retrieval on the website so that it can be tracked. If he does not do this, tracking must not be initialized under any circumstances. In addition, the user must be able to reject all third-party data retrievals with one click – i.e. a reject button must be integrated. Even if a user simply clicks away the cookie banner, they must not be tracked by Google Analytics. At the same time, website use must not be made dependent on consent to third-party data processing (with some exceptions for media houses and press), which means that the website must be usable even with a rejected cookie status.
Third -party data retrieval (with Google Analytics) differs from domain-owned data retrieval (with Matomo) in that user data is transmitted directly to a third party, such as Google Analytics, Calendly, Facebook, LinkedIn, HubSpot, Google Tag Manager, Hotjar, Youtube, Microsoft, Google Fonts, Google Maps and other third-party providers. This means: For GDPR-compliant tracking, these third-party data retrievals must be blocked before consent to data processing on the website. This can be done very reliably with the compliance data protection pluginfor WordPress websites. Complianz has a high-performance script blocker that can be used to reliably block the relevant third-party data retrievals. This means that Google Analytics only starts tracking data as soon as the user gives their explicit consent. But that has serious consequences in the standard configuration.
GDPR-compliant tracking: Google Analytics often only records a third of the traffic
When we measure our website traffic, it can often happen that the traffic recorded by Google Analytics drops by around two-thirds after a GDPR-compliant changeover , and only around one-third of the traffic is recorded. The reasons for this are:
- Bounce rate: If the bounce rate on the website is an average of 50% and Google Analytics only records if the users explicitly agree – the data volume of the users who have bounced off is not measured at all because they have not accepted the data processing in the cookie banner .
- Accept button: Only those who click on the accept button can be tracked by Google Analytics under GDPR-compliant implementation. If the user just clicks away the banner, he may not be tracked either.
- Reject button: Whoever clicks on the reject button must not be tracked by Google Analytics anyway.
These three factors result in a two-thirds drop in measured traffic. This is particularly disadvantageous – as a side note – for Google Ads campaigns, since user target groups from Google Analytics are a central basis for the algorithmic learning of the campaigns. In this way, Google Ads can find more similar users on the web, such as those who have already triggered a target action (conversion), such as a submitted contact form. Google Ads campaigns in connection with a standard integration of Google Analytics and GDPR-compliant tracking therefore have to work with a data basis that is three times smaller.
Example of the tracking slump after GDPR-compliant conversion with Google Analytics (dashed line: values in the same period of the previous year). With a Matomo installation on a WordPress website, however, we can regain the full data depth through server-side tracking, since no third-party data retrieval takes place with Matomo, and consent to third-party data processing is therefore not necessary.
Measure full data depth with Matomo installation on WordPress websites
Matomo, formerly Piwik, is the world’s most famous and popular server-side tracking application. Unlike Google Analytics, user data is not sent to a third-party server, but only to your own website infrastructure. This means that nobody else has access to the user data, except you. In such a case, it is no longer necessary to obtain consent for third-party data processing, since no third-party providers are involved here and Matomo is part of your own technical infrastructure. Matomo is also open source and free, so you can modify the system to your liking. Because Matomo also records the data on the server side independently of the cookie content and it is not transmitted to any third party, you can again measure the full data depth of your website visitors.
Instructions for Matomo installation on WordPress websites
Fortunately, installing Matomo for WordPress websites is now child’s play. Matomo has released its own, full-fledged WordPress plugin that you can easily install on your website. Install it to access Matomo in your WordPress dashboard .
Important: Make sure that the latest PHP version is installed on your web space. The best thing to do is set your hoster to automatically update PHP (if you haven’t already done so) so that your web space is always up to date. Matomo must be able to access the entire website when installing, and an older PHP version may cause a critical error on your website. In any case, make a website backup before the installation.
Install cookie-free tracking with Matomo: Disable cookies in Matomo
By deactivating the cookies in Matomo, you have somewhat fewer insights on the one hand, but you do not have to ask the user for the cookie confirmation in the cookie banner. You should therefore deactivate tracking with cookies in Matomo. To do this, go to the WordPress dashboard in the first step, then in the left menu bar under “Matomo” on Settings and then in the main field under the menu tab “Tracking” on “Disable cookies”. Save this setting.

Disable cookies in Matomo to only allow server-side tracking.
In the second step, you should click on reports in the left sidebar under the menu item “Matomo” in the WordPress dashboard. Once you are in the Matomo dashboard, click on the gear icon in the top right to access the Matomo dashboard settings. Then click on “Privacy” in the left menu and then on “Anonymize data”. Tick the box “Enforce tracking without cookies” and save the settings.
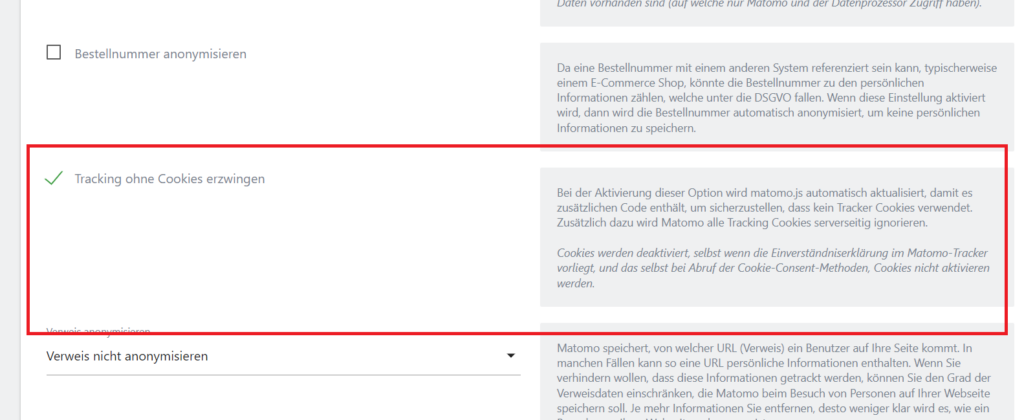
In addition to deactivating cookies in Matomo, you can also enforce tracking without cookies (entirely server-side) by Matomo.
Beginner's guide for using Matomo on WordPress websites
Once Matomo is installed on your WordPress website, go to the WordPress dashboard and click on “Matomo” in the left menu bar and click on “Reports” in the menu. You are now in the Matomo dashboard. Now click on “Visitors” in the left menu bar of the Matomo dashboard and then on “Overview”. Here you can see the graph of the last visits . At the top left you can set the date or select a custom time period. Just below the “Recent visits graph” you can configure the metrics for which you want to see a trend history – such as visits, average visit time or the bounce rate.
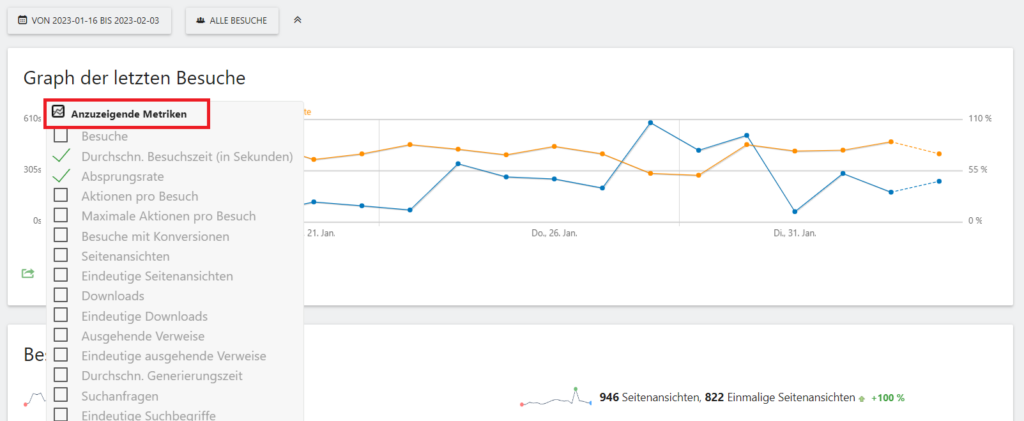
In the graph of the last visits, you can compare different metrics for different periods of time to understand developments and trends on your website. By installing Matomo on a WordPress website, you get back the full data depth, since there is no third-party data retrieval with server-side tracking and you therefore do not have to obtain consent for third-party data processing. In the end, only you have the data.
Important note: Page visit time at 0 seconds in Matomo
Important: If a user does not visit another page on a subpage of yours, their page visit time is given as 0 seconds by default , no matter how long they stay on the page. Also, its bounce rate is listed as 100% . You can change this setting with a custom setting in Matomo . In any case, don’t be alarmed if the overview says that the average visit time is 0 seconds on many pages that users came to via a Google search. This information applies to all pages at Matomo if no other page was visited from this session.
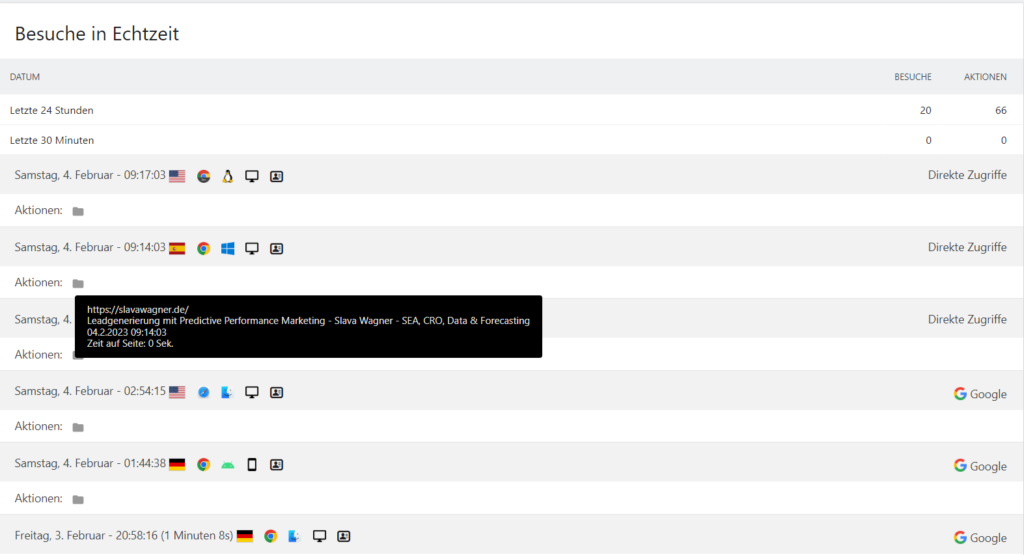
Don’t worry if Matomo only shows a page visit time of 0 seconds. As soon as you have installed Matomo on your WordPress website, the visit duration of a page from which no further click was made on another subpage is displayed as 0 seconds by default, regardless of how long the user was actually on the page. You can change this default setting if you wish (see section above).
Visitor log at Matomo on WordPress websites
If you want to track the activities of individual website visitors, you can use the Matomo visitor log. To do this, click on “Visitor” in the left menu bar in the Matomo dashboard and then on “Visitor log”. Then, at the top, select the date or custom time period that you want to see your visitors for.
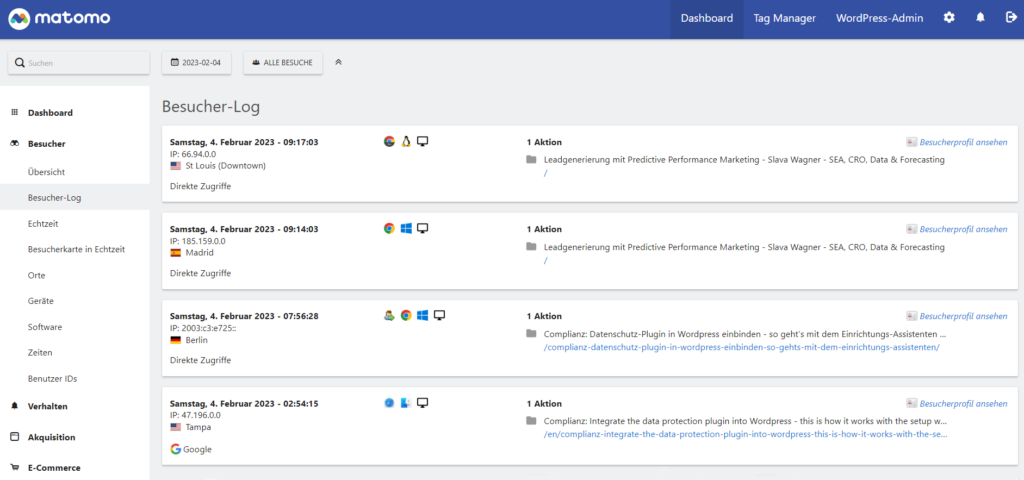
In the visitor log of your Matomo dashboard, you can see at a glance which visitors were on your WordPress website. This is roughly comparable to the user explorer known from Google Analytics. Here you can see the device type of the users, the operating system. the source of acquisition (search engine, referrals, direct hits), approximate location, screen sizes, browser type and pages visited.
Page overview at Matomo on WordPress websites: analyze jumps, loading times and average visit times
In the page overview you can gain exciting insights about your URLs. The average visit time or the bounce rate is displayed here (taking into account the note above on the subject of bounces at Matomo). It is also interesting that you can see the average loading time in seconds for each URL. In this way, you can quickly identify pages that may still have potential for optimization, because a fast loading time is not only important for usability, but is also a central indexing criterion in the organic Google search. To do this, click on “Behaviour” in the left menu bar in the Matomo dashboard and then on “Pages”.

What is particularly useful about the page overview in the Matomo dashboard is that it shows you the average loading time of individual subpages on your WordPress website. This allows you to see at a glance on which pages the loading time is somewhat affected, for example due to a heavy technical infrastructure.
Transitions at Matomo on WordPress websites: Track user behavior on individual URLs
In the “Behaviour” menu item of the Matomo dashboard you will find the “Transitions” sub-item. This allows you to see user behavior on individual URLs, i.e. where the users came from and where they went . This is roughly comparable to the user flow known from Google Analytics.
The transitions in the Matomo dashboard show you which links and redirects generate the URLs of your WordPress website. In Google Analytics one knew the representation for the user flow.
Conversion tracking with Matomo on WordPress websites
Just like in Google Analytics, you can create goals , i.e. conversion actions, with Matomo. These describe the measurement of the achievement of relevant actions by the user, such as reaching a thank you page after successfully submitting a contact form – or reaching a checkout page after an online order. If you don’t have a thank you page yet, you can use the WordPress plugins Contact Form 7 or WPForms to easily redirect to a thank you page as soon as a user has submitted a contact form.
To create goals in Matomo, you can easily click on “Goals” in the menu bar on the left in the Matomo dashboard, then on “Define a new goal”, and then name your goal and set the URL of the thank you page as the goal. Once that’s done, you can easily track what URL your contact form was submitted from, what acquisition source your leads came from, and your overall conversion rate (percentage of users who convert to leads) . You can also see how high the conversion rate is on individual sub-pages, service pages and blog articlesis with you This allows you to discover numerous exciting optimization potentials, for example when you see which URLs have a particularly low and below-average conversion rate.
After the successful installation of Matomo on your WordPress website, you can set goals in the data measurement – i.e.: install conversion tracking. A conversion is an accomplished goal by a website visitor, such as a contact form submission or an online purchase. With Matomo’s conversion tracking, you can directly measure which subpages of your WordPress website generate the most conversions and have the highest conversion rate.
In Matomo’s goal tracking, enter the URL of your WordPress site that corresponds to the thank you page or checkout page of a contact form or online purchase.
Conversion tracking with Matomo via UTM tracking
You can also track a thank you page or checkout URL after completing a goal with UTM links as well . You can use these UTM links, for example, in social media posts, in social media ads, in emails, in Google Ads campaigns or other advertising campaigns or traffic sources. You can then create a UTM tracking link for each advertising campaign or post . Matomo is able to read UTM links. Then create the corresponding goals that you need in Matomo according to the scheme above by storing the relevant UTM tracking link for each goal.
Matomo installation on WordPress websites
If you have questions about installing Matomo on WordPress websites or don’t know how to implement conversion tracking, feel free to ask:
Ask your question
info@slavawagner.de
Overview
- GDPR-compliant tracking: Google Analytics tracks often only a a third of the traffic
- Measure full data depth with Matomo installation on WordPress websites
- Instructions for Matomo installation for WordPress websites
- Beginner's guide for using Matomo on WordPress websites
- Important note: Page visit time at 0 seconds in Matomo
- Visitor log at Matomo on WordPress websites
- Page overview at Matomo on WordPress websites: analyze jumps, loading times and average visit times
- Transitions at Matomo on WordPress websites: Track user behavior on individual URLs
- Conversion tracking with Matomo on WordPress websites
- Conversion tracking with Matomo via UTM tracking
What are the advantages of Matomo's server-side tracking?
- Full control: Only you have the data. With Matomo’s server-side tracking, you do not pass on your website and user data to third parties such as Google Analytics, they belong only to you.
- Full data depth with Matomo: Because there is no third-party data retrieval, your users do not have to first give their consent to third-party data processing in the cookie banner. This means you can collect the full range of data.
- Matomo is open-source: it’s modifiable, secure, reliable, and free.
Ask your question
info@slavawagner.de
FAQ - Summary of Matomo installation on WordPress websites
Here you will find a summary of important and frequently asked questions about installing Matomo on WordPress websites and the advantages of server-side tracking.
You can easily install Matomo on WordPress websites with Matomo’s official WordPress plugin. The plugin is free and after installation you can directly access your Matomo reports directly in the WordPress dashboard.
With server-side tracking, third-party data fetching doesn’t happen on your website like Google Analytics would in its default implementation. This means: Only you have access to the data. Because there is no third-party data retrieval, you do not need consent to third-party data processing in the cookie banner either, so you can track the full data depth of your website visitors with Matomo.
Similar to Google Analytics, you can set your goals for conversion tracking in Matomo. To do this, go to the Matomo dashboard from “Goals” and then to “Define a new goal”. Here you can, for example, store the URL of a thank you page to which a user is forwarded after submitting a contact form. If you have an online shop, you can also store the URL of the checkout page.
A page visit time of 0 seconds at Matomo is given by default on pages from which no other pages were visited, regardless of how long the user was on the page. You can also change this default setting at Matomo.
You might also be interested in:
Schema markups for FAQ questions: More clicks from organic Google search
To have a chance get into the related questions section at the top of Google Search, you can set up your answered questions with FAQ schema markup.
How to install the AMP integration on WordPress websites according to GDPR
With the AMP integration you can get up to 25% more organic impressions in search engines on your website.