Facebook Ads lead forms (instant forms) for direct inquiries, white papers & webinars
Above all, digitization means the digitization of sales channels. This also applies to expanding your own lead generation on Facebook. Leads from Facebook lead forms are very cheap due to the low hurdles to submitting the instant form via auto-fill-in. The prospect of suitable and qualified customers is high, even if an unsuitable lead comes through every now and then.
Contact requests from potential customers are required, especially for service industries and for B2B products – and lots of contact requests. This can be contact requests for a consultation, for direct inquiries or registrations for information events and webinars.
Like Google Ads and LinkedIn Ads, Facebook also has lead forms. These are simplified and platform-internal contact forms that are triggered when the ad is clicked. They are characterized above all by the data entry, which is largely automated by the system via auto-fill-in . This ensures a very effective low-threshold in decision-making, which is why registration is very easy.
Various data can be retrieved from the user’s profile or device, such as the e-mail address, telephone number and various information that the user has entered in his account. You can also set custom questions for lead qualification, such as querying a company website. Lead forms have a much higher conversion rate than a redirect to a landing page, so the cost per lead is much lower.
How-to: How to create Facebook Ads lead forms
Step 1 - Select campaign type 'Leads'
First, go to the Facebook Ads Manager. For the creation of lead forms in Facebook Ads, a separate campaign type must be selected: Leads . In the second step, this campaign type enables you to assign a so-called instant form to your ad. An instant form is an alternate name for lead form.
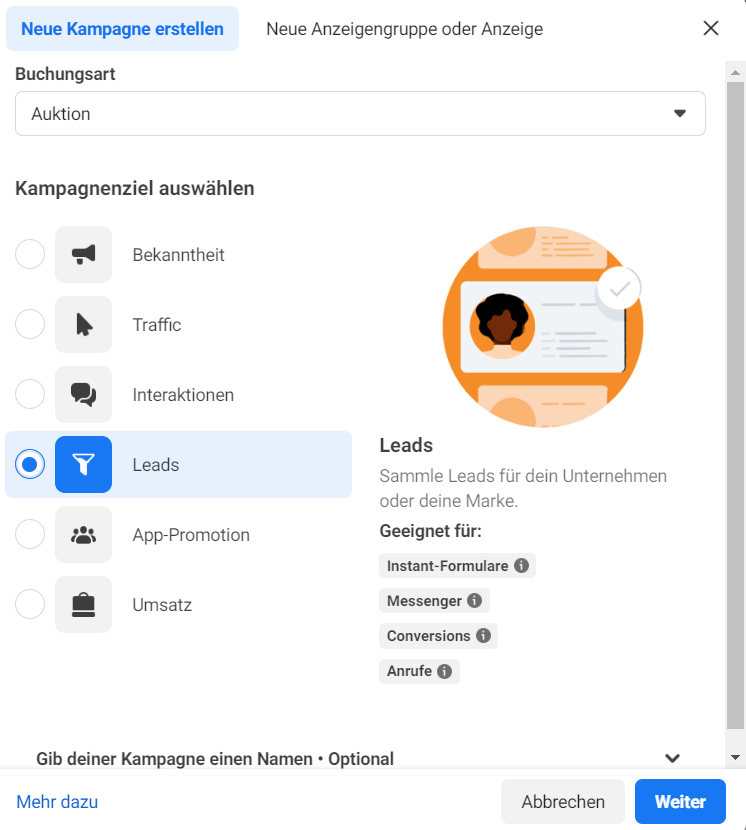
Select Leads as your campaign objective if you want to use instant forms – i.e. lead forms – as a target for your ads.
Step 2 - Select Instant Forms (Lead Forms) as Conversion Location
When setting the conversion location, the system asks how you want to generate conversions: With a tracking pixel on the website (e.g. by redirecting to a thank you page), in the form of tracked phone calls or with a Instant form – that is, with a lead form. Accordingly, select the Instant Form option so that you can create a lead form in the second step.

Choose Instant Forms as your conversion location so that when users click on an ad, they are presented with the lead form with auto-fill for contact information.
Step 3 - Assign instant form (lead form) to an ad and select form type
You can edit a lead form once your ad is set. You can then add a new lead form to the ad so that every time people click on your ad, they only see the lead form. That means: First configure your complete, newly created campaign, with budgets, target group targeting and location targeting and create your ad. Then the option to create a new instant form (lead form) will appear .
There are two options for form type: Higher Volume Lead Forms and Higher Intent Lead Forms. Higher volume lead forms allow you to maximize the total number of leads. This is mainly due to the low threshold of the form design, which enables sending in two clicks. For higher intent lead forms, you can add an extra qualification step so the user can double-check what the offer is and what they’re signing up for. This is a common problem with the first type of form: some users don’t actually read the ad, but find it interesting, click on it and just submit the form without reading what the ad was all about. This doesn’t always have to be a problem, but if you want to tighten the screws for maximum lead quality.

For the form type, choose Higher Volume for a maximum number of leads you want to generate, or Higher Intent to maximally qualify signing up users so that fewer but more qualified leads come in.
Step 4 - Add titles and descriptions to the instant form
Now add a headline and description that is either functionally related to your signup item or written in a way that is curious and engaging. Also, you can add a custom background image, otherwise the system will pull the background image from your Facebook business page. In the second Settings tab next to Content you can configure the language of your lead form.
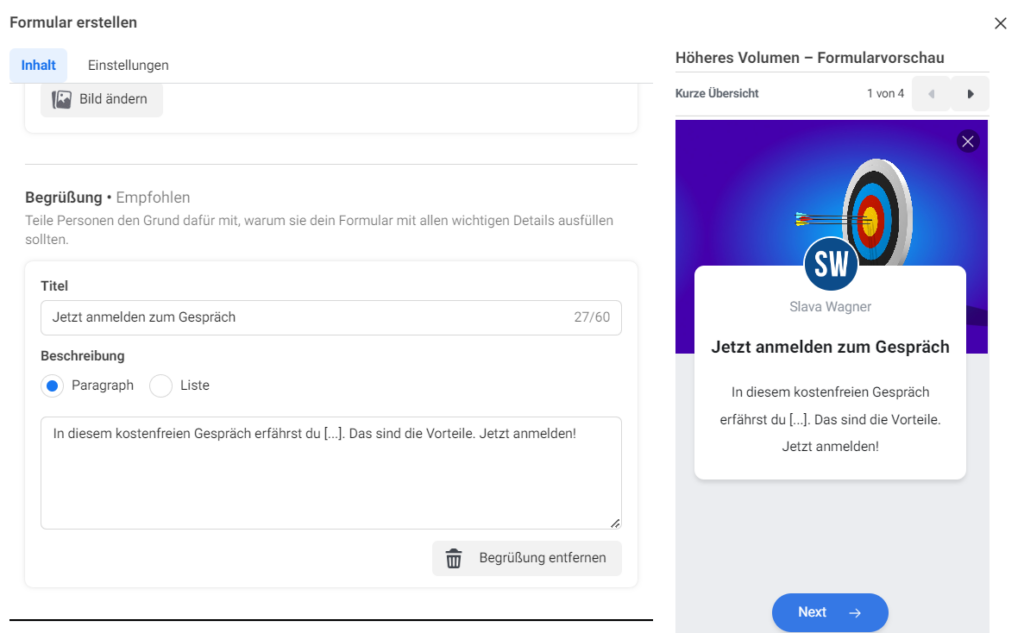
Give your lead form (instant form) an appropriate title and description. Make sure it’s not high-threshold and scares users away. At the same time, it should clearly tell users what they are signing up for.
Step 5 - Set data retrieval for auto fill-in
One of the most important steps is to configure the lead form data retrieval via auto-fill-in. Details such as phone number, email address, profile name and location data are automatically transferred from the profile data to the lead form. Certain demographic information such as age, company, job title and company size can also be transferred to the lead form.But remember: the more input you ask for, the higher the probability that a user will not convert when he sees the large amount of data asked for. You can also ask custom questions that the user has to enter manually – in the form of single-line text fields or checkboxes. Since the subsequent input from the user does not happen with auto-fill-in, user-defined questions greatly reduce the conversion rate. Therefore, custom questions are especially good if you want to raise the quality of the lead a little bit and thus raise the hurdle to submitting the lead form.
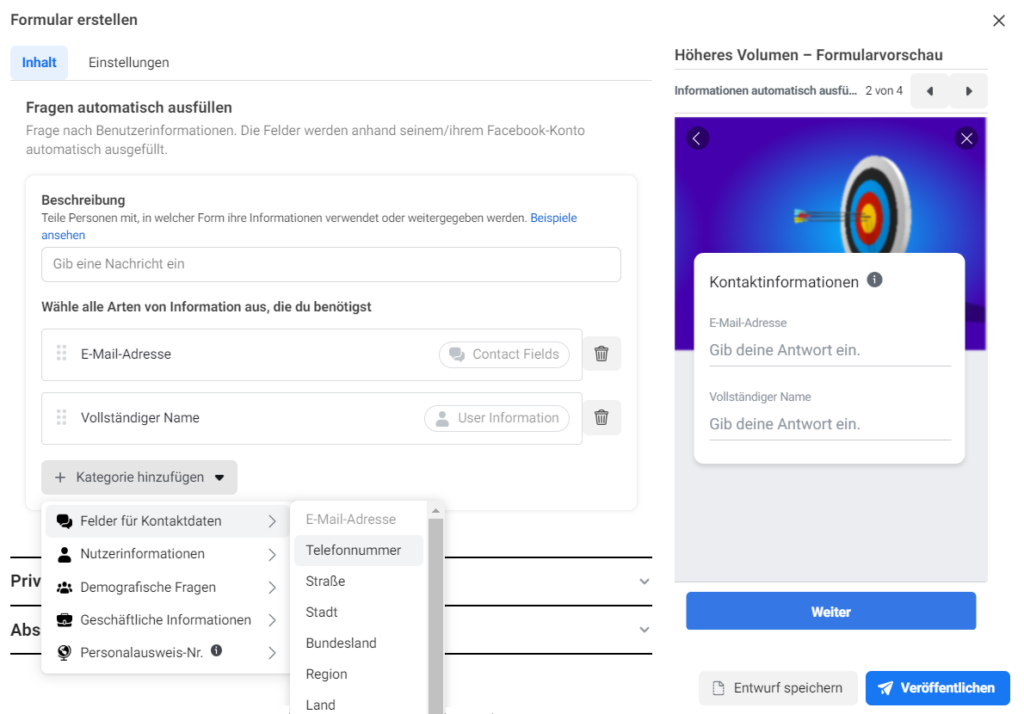
Specify the contact data import via auto-fill-in. The information required for this is drawn from the user profiles of the applicants.
Step 6 - Enter data protection information
One of the last steps is to edit the data protection information. This is important because the user agrees to your data processing by submitting the lead form on Facebook. Therefore, the link to your data protection declaration must be included in the Facebook lead form, because this explains which data is processed and which third-party services are used for this processing.
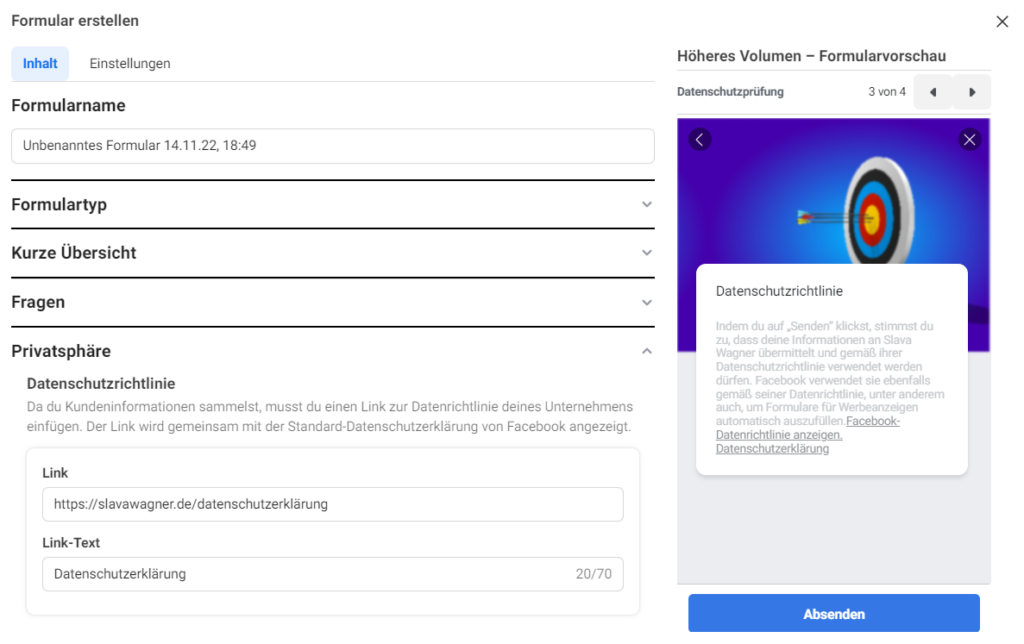
Enter the link to your privacy policy.
Step 7 - Completion and Redirect to Home Page or Thank You Page
Almost done: Enter some information for the display after successfully submitting the lead form.
- You can insert a closing text here and set a link to your website / start page / product page
- Or you can also use this area to draw the user’s attention to another offer/topic and store the corresponding landing page as the link target (at: View website) and use a custom call-to-action text
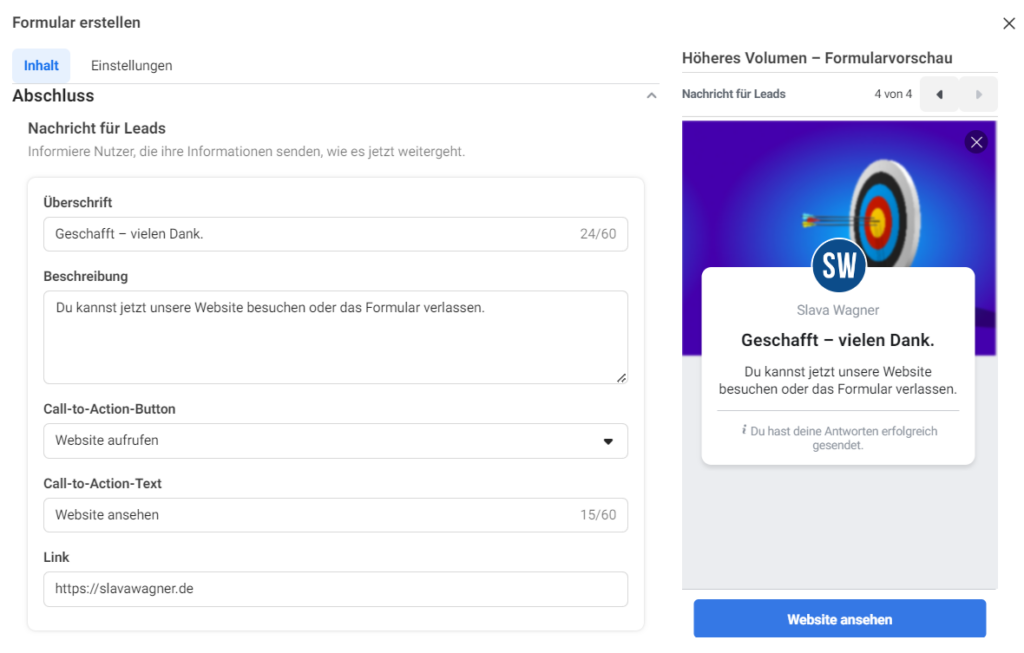
Write a short thank you text or prepare the user for the next higher funnel level by teasing another product or service.
Set up lead syncing: Automated mail dispatch for incoming leads
If your Facebook Ads campaign with lead forms is running successfully and the first leads are generated, the contact data is only ever stored system-internally at Facebook. You can download the leads in CSV format in the Ads Manager at any time and you will receive all contact details of the applicants. However, this is cumbersome, because if in doubt you have to check manually every day in order to forward the user’s contact details to your sales department, for example. In addition, confusion can arise from the need to constantly update the lists to avoid resubmitting and re-contacting old contact entries that sales have already reached.
There is a convenient and free solution for this purpose: you can set up a lead sync via email or have the leads imported directly into a CRM with HubSpot and Zapier free accounts. In addition to the CRM contact data import, sending an e-mail has the advantage that as soon as a new lead comes in from a Facebook lead form, you automatically receive an e-mail with all the contact data. You can also send the email to any email address in your sales team.
You can also connect the leads directly to a mail chain from Zapier, for example via Mailchimp. This allows you to also send users a double opt-in email, provide them with exciting information material and specify Calendly appointment suggestions for consultations, so that you can win even more deals from the leads if the contacts did not convert at the first attempt or did not convert reported back immediately.
Qualify leads from Facebook Ads lead forms
Especially on Facebook, which is primarily used privately as a social media portal, fewer people can be reached in a business context than, for example, on LinkedIn. The lead quality on Facebook can therefore vary, which is why it can be worthwhile to set manual qualification questions in the lead form, then automatically import the leads into a CRM and send them an automated double opt-in email. In this way, we can see directly how many users passed the qualification, how many agreed to email contact, and are therefore actually interested in the offer, so that it is worth conducting a consultation.
Start targeting test runs
The system’s own targeting options are the central control mechanism in the delivery of the advertisements. With the large number of targeting options, we can display our ads in such a way that the impressions are delivered particularly strongly to interested and qualified people. We can also A/B test the content of the ads to determine the most effective and converting ad version. By targeting lookalike audiences, it is possible to reach similar users who are particularly willing to buy. These can be visitors to a website, users who have already clicked on an ad, or visitors who have already been to a specific landing page.
When aiming at the desired target group, sooner or later it sooner or later turns out that not every component of the target group configuration contributes to success in the form of a good cost point per lead – but only eats up budget because the impressions delivered come to nothing. For this reason, the following applies here: Many different targeting tests should be run, starting with a broader target group and moving towards gradually smaller and more specific target groups.
Facebook Ads lead forms (instant forms)
Are Facebook Ads Lead Forms (Instant Forms) worth it for your campaigns and business goals? And is the lead quality right? If you have any questions regarding this blog article, feel free to ask:
Ask your question
info@slavawagner.de
Overview
- Step 1 - Select campaign type 'Leads'
- Step 2 - Select Instant Forms (Lead Forms) as Conversion Location
- Step 3 - Assign instant form (lead form) to an ad and select form type
- Step 4 - Add titles and descriptions to the instant form
- Step 5 - Set data retrieval for auto fill-in
- Step 6 - Enter data protection information
- Step 7 - Completion and Redirect to Home Page or Thank You Page
- Set up lead syncing: Automated mail dispatch for incoming leads
- Qualify leads from Facebook Ads lead forms
- Start targeting test runs
- Consider hidden interests in targeting on Facebook
Do you have questions about using Facebook Ads lead forms (instant forms)?
These are the most important key data when using Facebook Ads lead forms (instant forms):
- High conversion rates thanks to auto-fill-in: Because email addresses and telephone numbers are automatically transferred to the lead form, you can get a lead for an incentive (e-book, white paper, webinar, information event) for less than €5 and a direct request for a consultation for about 10€ – 30€ .
- In the case of lead forms for direct inquiries , manual questions should be included if necessary in order to increase the commitment of the applicants.
Ask your question
info@slavawagner.de
You might also be interested in:
Track phone number redirects from Google Ads campaigns
With Google Tag Manager you can install phone number forwarding for Google Ads campaigns on your website.
Create reports with Data Exploration in Google Analytics 4
Many report views that were preconfigured in Google Analytics 3 must be manually created in Google Analytics 4.