Create Calendly integration for the website and send appointments via email with HTML buttons
With Calendly you can quickly and easily provide appointment bookings for your online users. If you also integrate the dates in your newsletter mails with HTML buttons, you can win even more leads.
The appointment booking tool Calendly enables your users to book appointments quickly and easily. The application is high-performance, convinces with a clever UX design and a quick loading time. You can create different calendars for different purposes and platforms or duplicate existing calendars. Each calendar gets a different link so that you can track the response from each calendar to the platform on which you published the calendar.
With Calendly you can track returns by registration platform very well
The most important functions are already included in the free basic version. If, for example, you would like to have an SMS reminder sent to your applicants in addition to an automatic email reminder, you would need the paid version, which starts at $8 a month. In the free basic version you can also only create one calendar – with the paid version you can create unlimited additional calendars and thus test different speeches in parallel or place them on different websites and social media platforms. This helps you to track responses on individual platforms, because with the paid version you can also set up redirects to thank you pages to evaluate platform buybacks or posts via Google Analytics.
Calendly has very high appointment appearance rates
Calendly creates clear commitments for the registrants with email and SMS reminders days before the appointment takes place and again just before the appointment.In general, Calendly convinces with its low-threshold UX design, which makes it particularly easy for users to register. Superfluous elements don’t appear in the first place, so your applicants aren’t distracted. You can register with just one click on a desired date, from where you only have to enter a few contact details. Then everything happens automatically: The appointment is set directly in your synchronized Google or Outlook calendar and contains all relevant login information. In addition, the applicant receives the appointment confirmation as an e-mail, can accept the appointment in the calendar and automatically receives a reminder e-mail before the appointment takes place. This ensures that participation with Calendly is extremely high compared to normal appointment bookings via conventional contact forms. If an automated SMS also informs the applicant of the upcoming date, this creates an even greater commitment and also makes an impression.
Strong responsive design and nice email integration
Last but not least, Calendly has a very good responsive integration for websites and the dates of the individual appointments can be neatly copied in HTML format to enter them in emails. Simply store the Calendly URL ending in each button as the link target. This gives email subscribers a tactile appointment-booking experience that is much better than just dropping in a simple link—because users see what appointments are available immediately, rather than having to go through this step after clicking on a normal one to be able to make a link. This greatly increases the registration rate (conversion rate).
I. Instructions for creating a free Calendly calendar with calendar sync
Step 1 – Go to the main Calendly dashboard https://calendly.com/ and click the button on the top right to create a new account. Sign up with the email address the calendar is synced to. Run the calendar sync.
Step 2 – Calendly URL: Now set your calendar URL ending. You can then send this URL so that users can register online for an appointment with you.
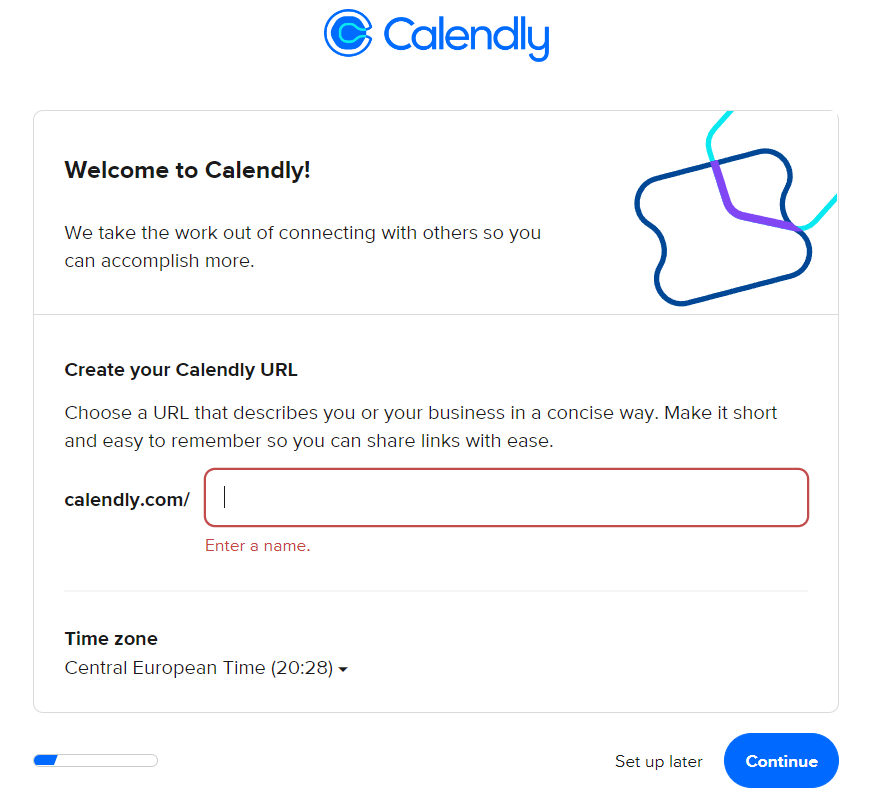
Set a URL extension for your Calendly calendar.
Step 3 – Calendly availability: Set the times at which you offer appointments every 30 minutes. You can also revise this setting later. It is best to limit availability to two to three days with an interval of two to three hours – that is perfectly sufficient. In particular, if you send emails with Calendly appointments in the second step, this can be worthwhile, since online users can book all appointments on one day. So it’s difficult when you suddenly have to process a total of 15 customer calls from 9:00 a.m. to 4:30 p.m. the following day.
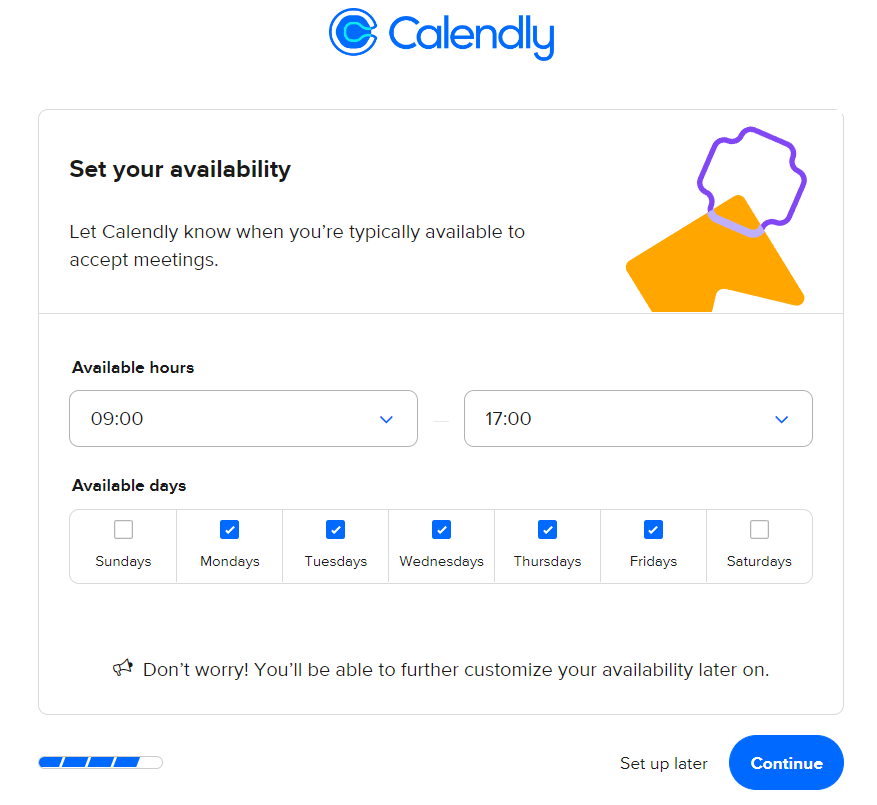
Set your Calendly availability.
Step 4 – Briefly select which area you work in and what you want to use Calendly’s appointment booking functions for.

Set Calendly when you are available.
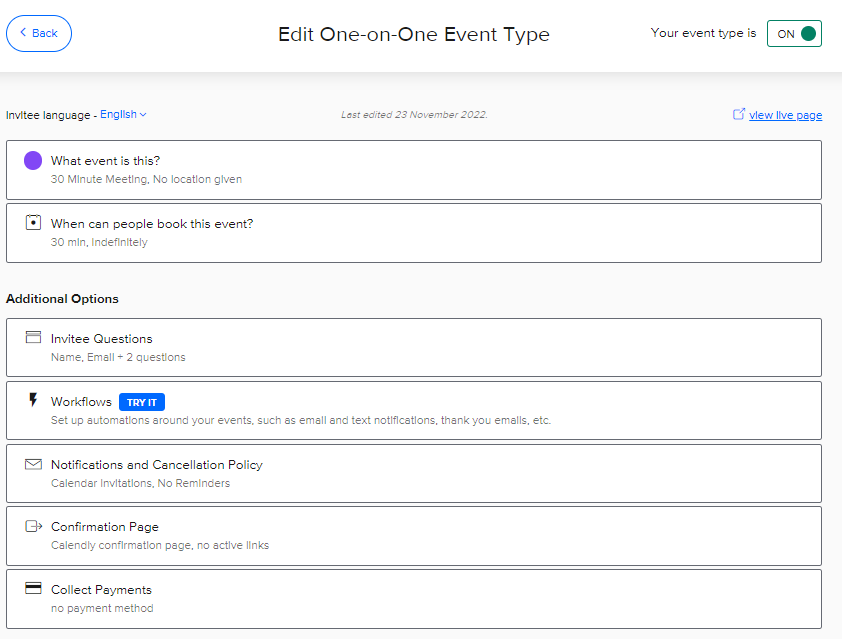
Step 5 – Done: The setup is complete and you are now in the main overview. From your first, default calendar, click the gear icon in the top right, then click Edit.
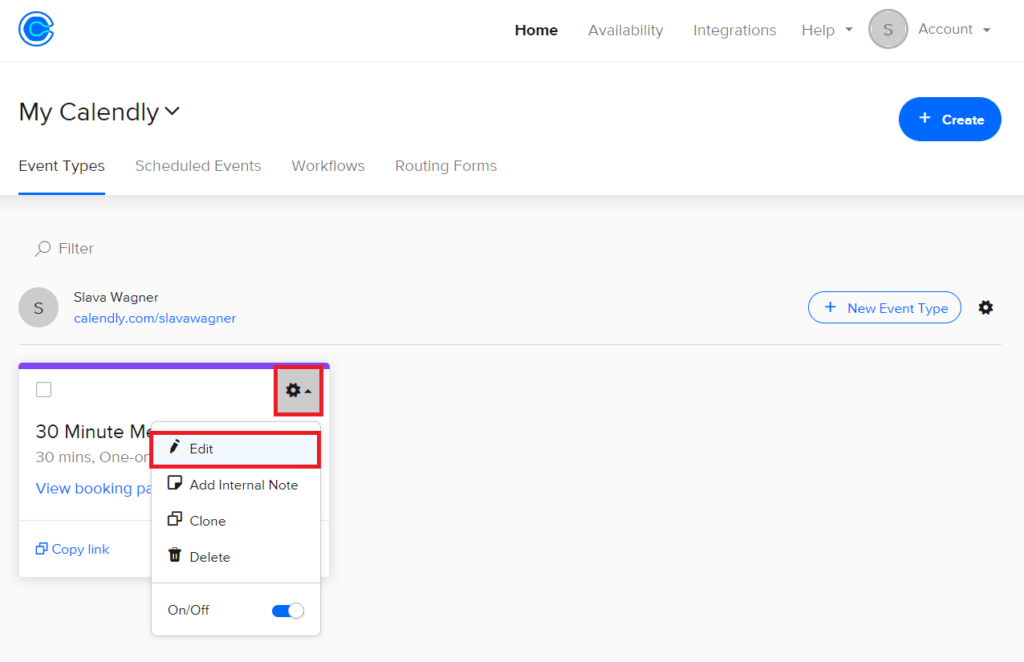
Click the gear icon on your Calendly calendar, then click Edit.
Step 6 – Language of your online users at Calendly: Above at Invitee-Language you can set the language of your calendar at Calendly – for example German. But you can also leave the setting in English if you don’t want to set up separate copies for German and English and would rather use a universal calendar in English instead.
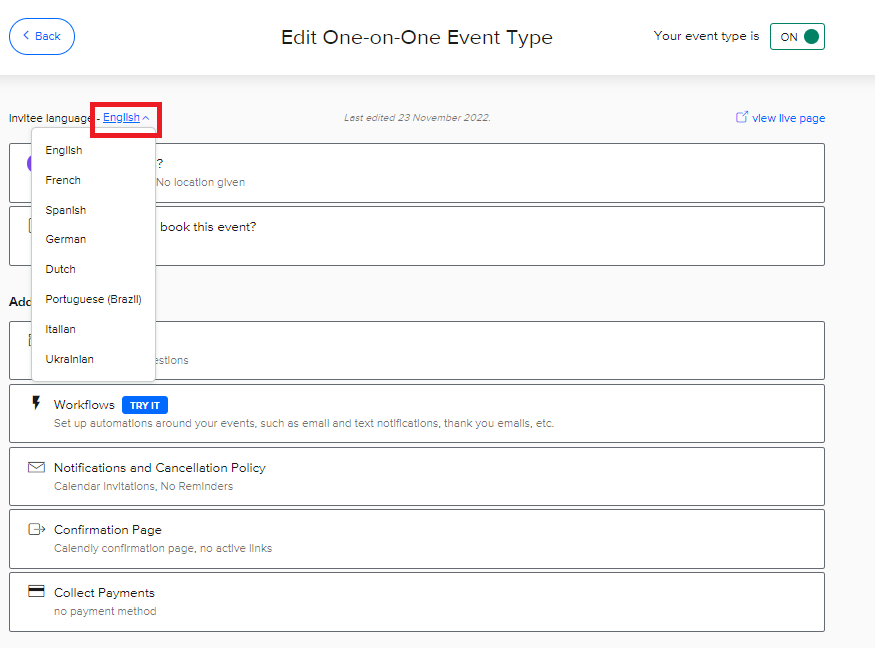
Set the language of your Calendly calendar.
Step 7 – Calendly event description: In the first point What event is this? you can optionally set a small description and a title, which is then displayed in the calendar. After that click on Save & Close.
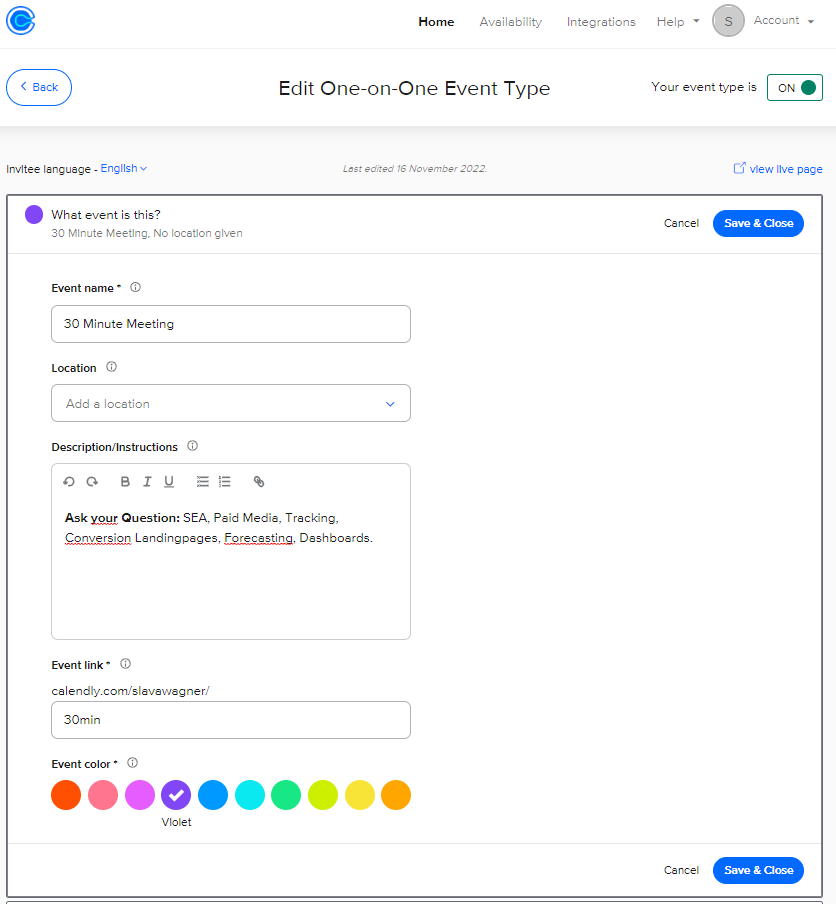
Set a description for your Calendly calendar.
Step 8 – Adjust Calendly availability and set it up indefinitely in the future: In the second point ” When can people book this event?” you can set the time span of your appointments. It is best to tick the Indefinitely into the future check box under Date range. Below you can edit the days of the week and times on which you offer appointments under Custom hours. Don’t worry: If you’re on vacation or otherwise prevented from attending, you can cancel individual appointments later at any time.
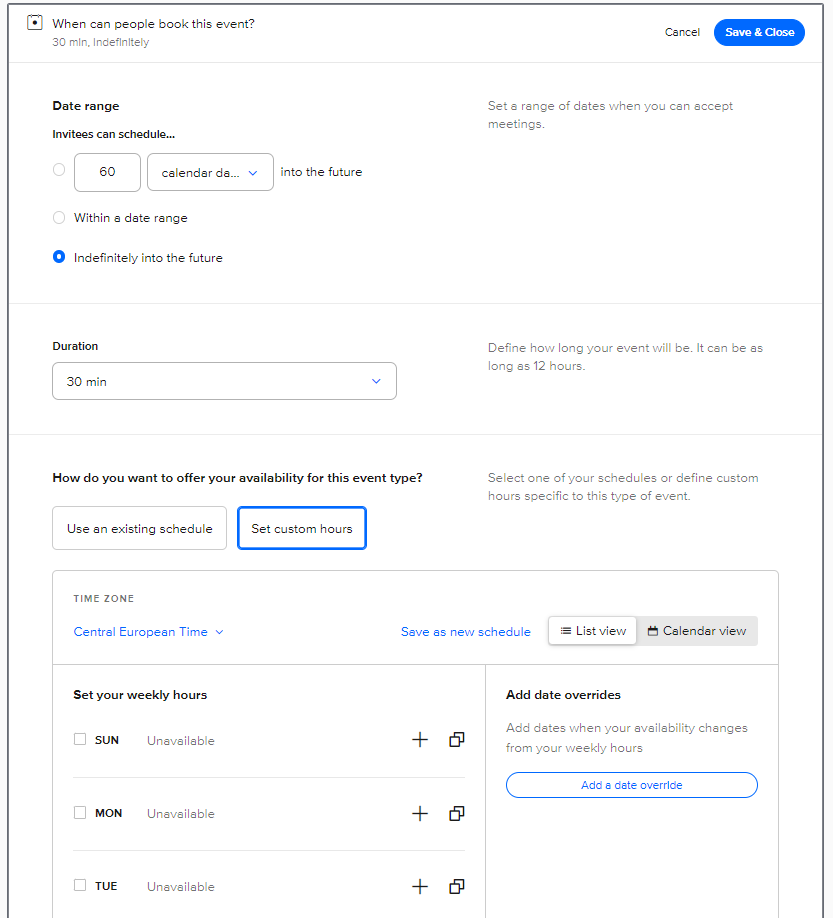
Here you can set your Calendly availability more precisely and in more detail.
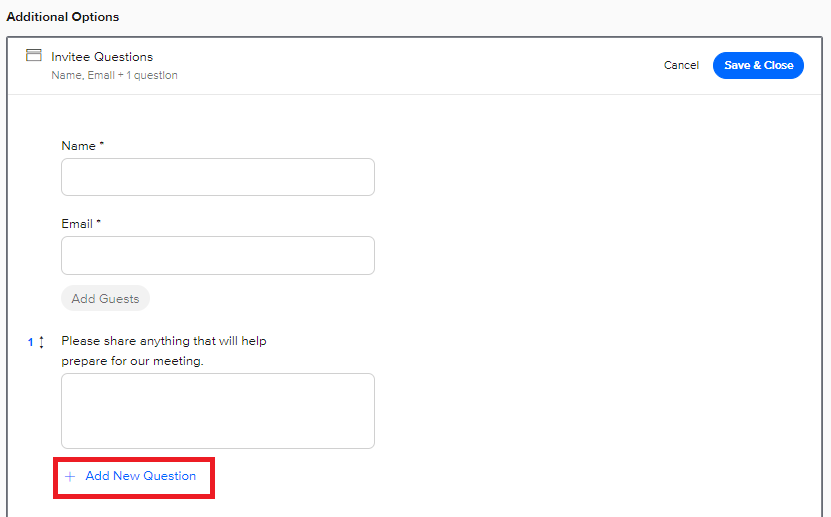
Step 9 – Form input fields for your Calendly calendar: In the third point, Additional Questions, you can ask your users various questions. These are the contact form fields that the user must fill in if they want to register for an appointment with you. Remember, the more questions you ask, the more likely the user won’t change their mind.
But there is one form query that you should definitely include, and that’s the phone number. To do this, click Add New Question below. Attention: If you do not ask for the telephone number, the appointment publication rate can be very low, as otherwise you only have the e-mail address of your applicants. If you then write to them to arrange a medium for the call (phone or video call), experience has shown that only a third of users will get back to you. If you ask for the phone number right away and the consultation is supposed to be a phone call, the appointment rate is usually over 95%.
Add the phone number query to your Calendly calendar.
Now enter “phone” or “telephone number” for Question and then select Phone Number from the Answer Type drop-down menu. Done: If a user now books an appointment with you, they have to enter their phone number.
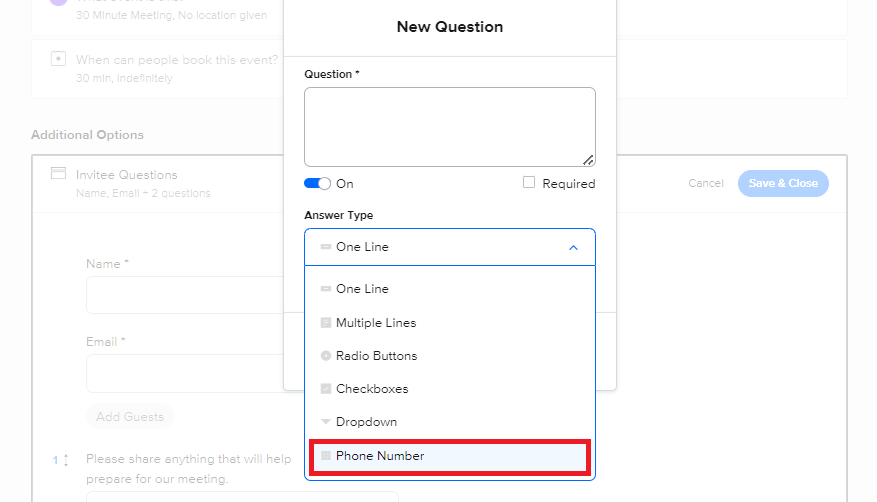
Select the phone number so your users can enter it. Check the Required box to make the entry a mandatory field.
Step 10 – Calendly appointment reminders: This is one of the most important steps: In the Notification and Cancellation Policy , you can configure your calendar synchronization in the Calendar Invitations section at the top. Every time a user books an appointment, you automatically receive a calendar entry in your Outlook or Google calendar with all user data. Click Personalize to sync with your calendar.
If you want, you can activate the on button for e-mail reminders in the second step, so that users receive an automated reminder e-mail as soon as the appointment is approaching.
You can ignore the other functions so far – they are only available in the paid version, and with this you can send automated follow-up emails and automated reminder SMS.
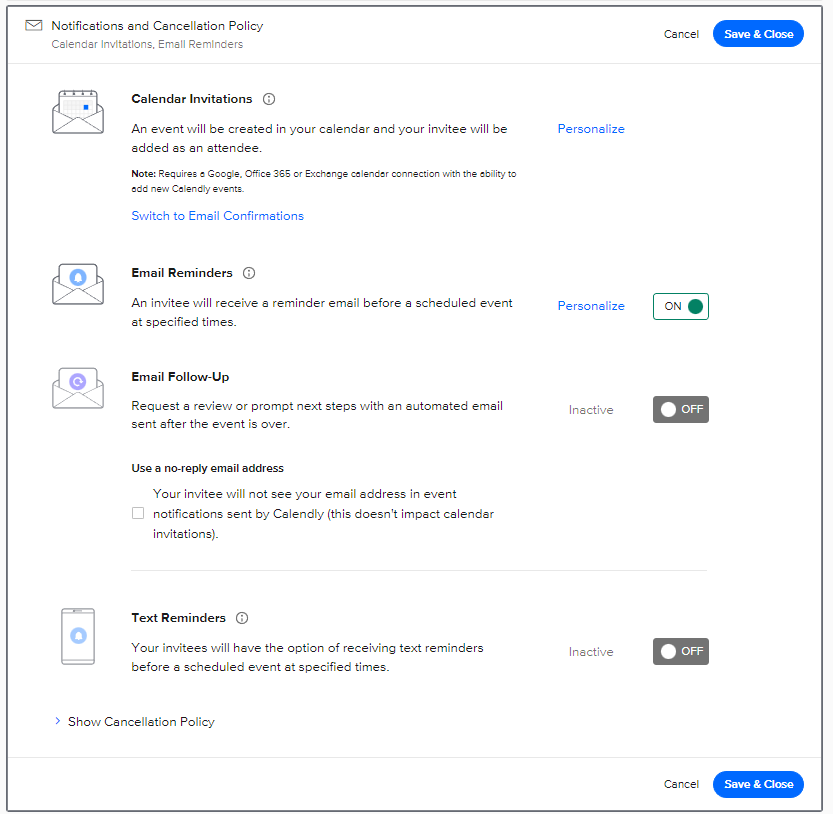
Set an email confirmation for your Calendly calendar.
Step 11 – Calendly tracking for Google Analytics: In the Confirmation Page item, you can select the Redirect to an external site option and enter the URL of your thank you page in order to track the registrations in Google Analytics.
This allows us to automatically track in Google Analytics how many users have booked an appointment. Check the Pass event details to your redirected page box.
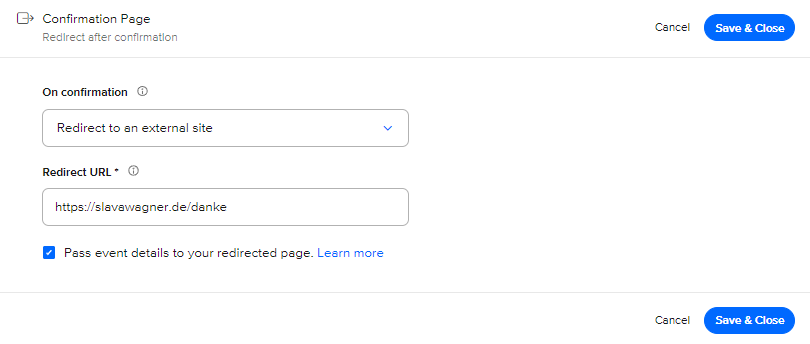
Set a redirect to a thank you page from your Calendly calendar.
Step 12 – Done: Now click on View live page at the top right of the page. Now you can see your calendar. Copy the URL if you want to send it to someone.
Click View live page in the top right to see your Calendly calendar.
II. Instructions for embedding a Calendly calendar in the website
A Calendly calendar on your website gives your online users the opportunity to register for a consultation appointment with you. Don’t worry: until a user uses such a non-binding, optional offer, especially in a blog article, the interest must be really high. This means: As a rule, highly qualified users who have seen a lot of your content, know you and the topic, and ask very specific technical questions register. So you do n’t have to worry about only unqualified people signing up on your site.
Step 1 – Share button in your Calendly calendar: Go to the main overview of your Calendly account and click on the share button in your calendar.
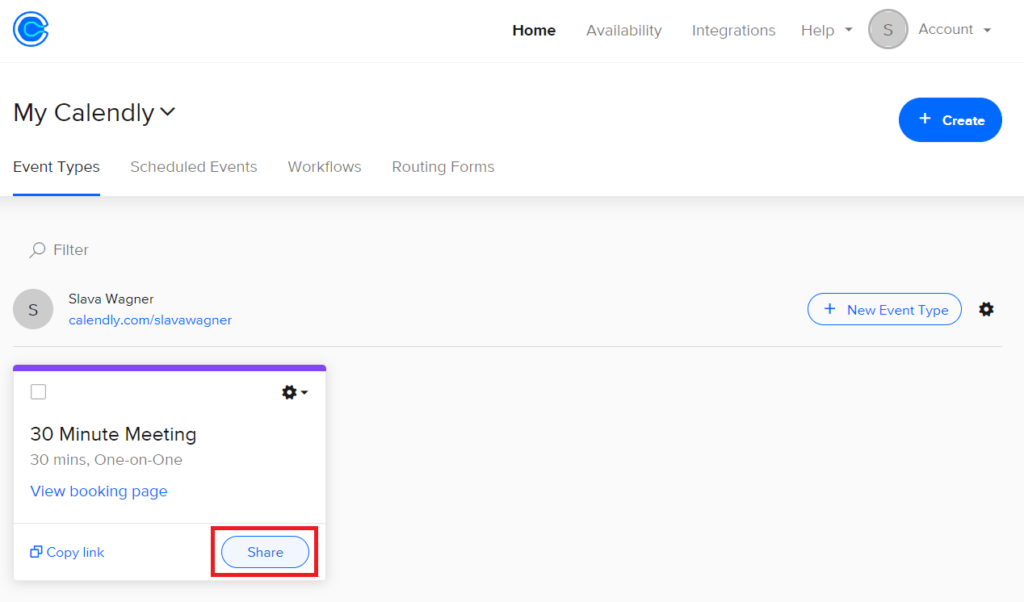
Click the Share button on your Calendly calendar.
Step 2 – Navigate to Add to website in the Calendly Share feature: Navigate to Add to website and select the first option Inline Embed if you want to embed your Calendly calendar firmly into the website.
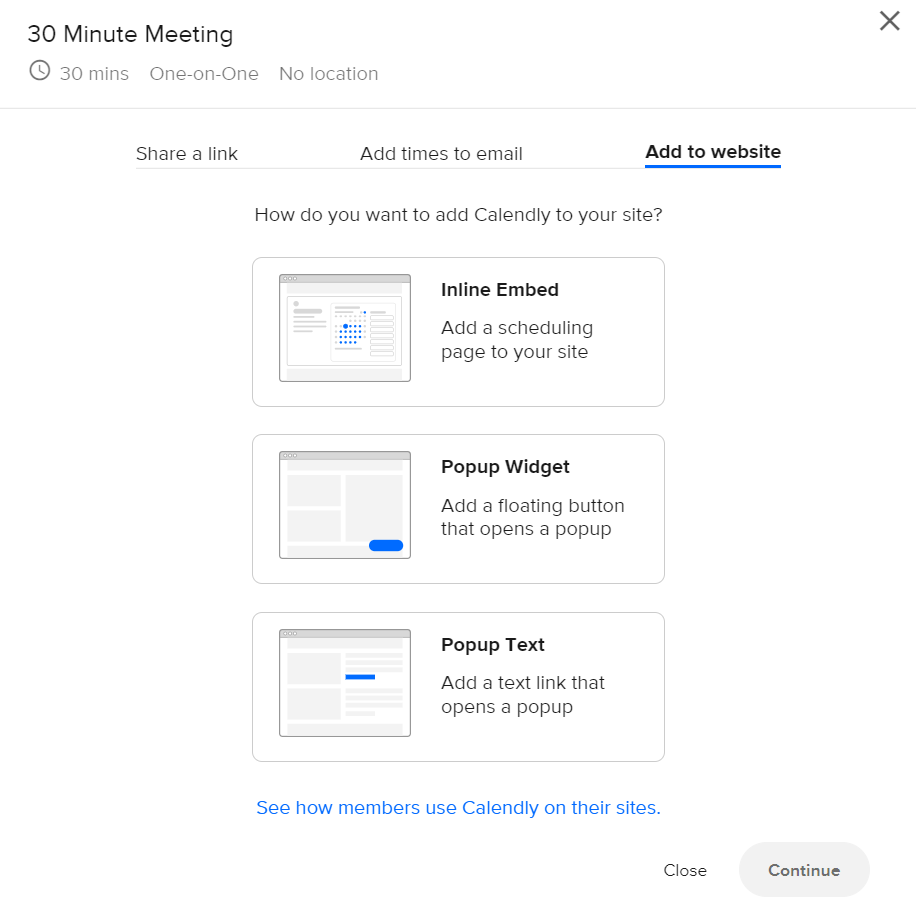
Select Add to website to integrate your Calendly calendar into a website.
Step 3 – Copy the HTML embed code of your Calendly calendar:You will now be given an embed code in HTML format that you can integrate into your website. You can optionally make a few design-technical settings in the left toolbox, such as adjusting the background, the font color, the button and link color, and using the Calendly cookie banner (should be retained and not excluded). If you want to remove the Calendly branding from the calendar, you can only do this in the general main settings at the top right of the account > at Account Settings / Account Settings > and then at Branding. There is a check mark with which you can deactivate the branding – but this is only possible in the paid version. I would keep the branding as Calendly is very well known, as well as for data security and technical reliability, as a neutral place between the online user and you. It’s like the difference between a PayPal payment and a manual transfer: PayPal stands for simplicity, reliability and neutrality for users. So I would definitely keep the Calendly branding in the paid version too.
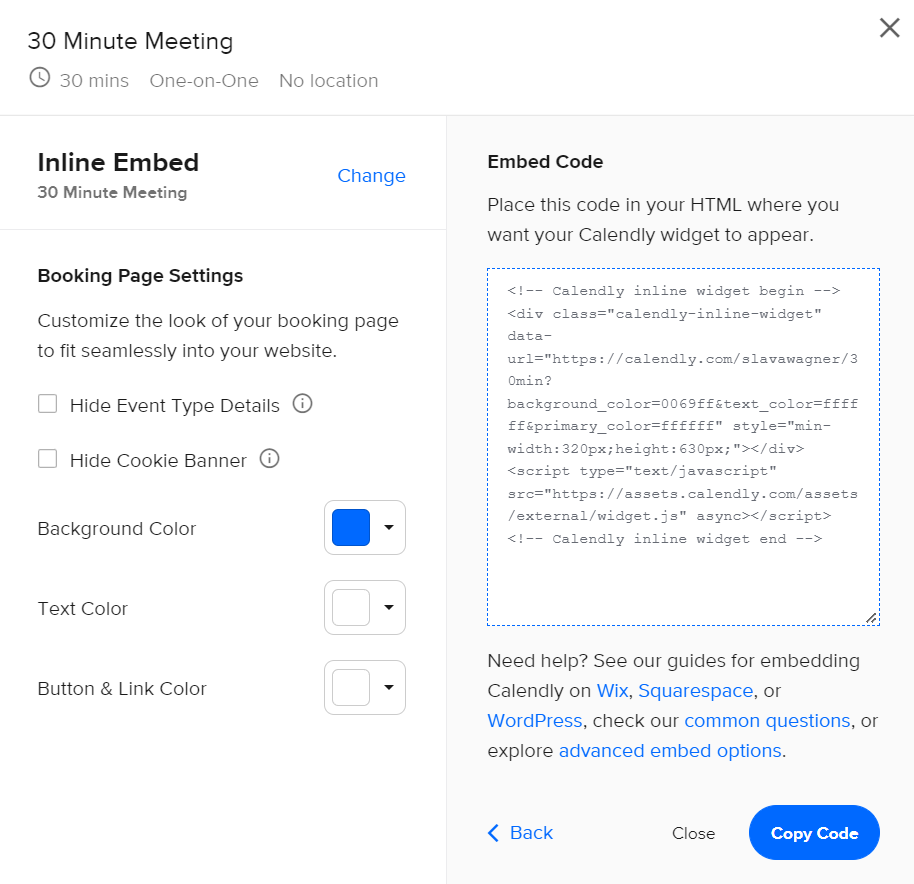
Set the coloring of your Calendly calendar.
III. Instructions for embedding a Calendly calendar in the email
If you want to integrate your Calendly appointments into an e-mail, this can be done using HTML. It is not possible to build in an interactive, full-fledged calendar with functions in this form, since this would have to be done with JavaScript, which cannot be transported in e-mails. But you can copy individual Calendly calendar appointments as HTML buttons and put them in an email. Simply select the main calendar overview as the link target for each appointment – with the URL ending of your calendar from instructions I step 2.
Format Calendly appointments for email and paste them as HTML: After clicking your calendar’s share button, navigate to the Add times to email tab, copy and paste the formatting into your email, and adjust appointment dates, formatting, and link destinations. This gives users a much more tactile experience when selecting appointments directly on the e-mail.
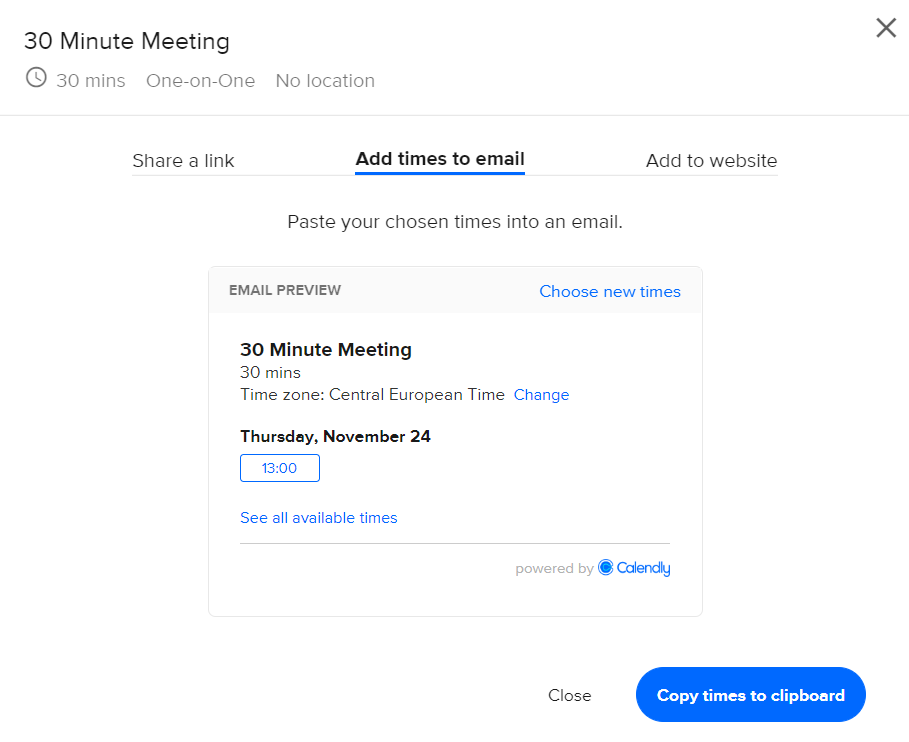
Click Add times to email to include HTML buttons from your Calendly calendar in an email.
Calendly integration in websites and e-mails
Having trouble embedding Calendly calendars in websites and in the HTML structure of emails? Feel free to ask:
Ask your question
info@slavawagner.de
Overview
- With Calendly you can track returns by registration platform very well
- Calendly has very high appointment appearance rates
- Strong responsive design and nice email integration
- I. Instructions for creating a free Calendly calendar with calendar sync
- II. Instructions for embedding a Calendly calendar in the website
- III. Instructions for embedding a Calendly calendar in the email
Lead generation with Calendly integration in websites & emails
With a Calendly integration, you can generate leads on websites and create qualified appointments from your email funnel at the touch of a button. The prerequisite for this is that you integrate the Calendly calendar correctly into websites and emails.
On websites , this is done with an iFrame that you can get directly from Calendly.
For e-mails, you can use Calendly’s e-mail integration function to copy the relevant template for formatting the appointment buttons as HTML and paste it into your e-mails. Then enter the link to your calendar in the appointments.
Ask your question
info@slavawagner.de
Overview: Calendly integration on websites for lead generation in online marketing
A Calendly integration on a website can be of great use in lead generation in online marketing. The integration allows prospects to book appointments with the company quickly and easily without the hassle of back-and-forth email exchanges. By integrating Calendly into the website, businesses can streamline their processes and provide customers with a seamless experience, which can result in a higher conversion rate. A Calendly integration also offers the ability to automatically add meetings with prospects to the sales rep’s calendar and send reminders. In addition, Calendly also offers integrations with many other tools such as CRM systems and email marketing platforms, resulting in a seamless connection between different systems. Overall, a Calendly integration can help companies generate more qualified leads and increase their efficiency in the sales process.
FAQ - Summary of Calendly integration on websites and in emails
Here is a summary of important and frequently asked questions about the Calendly integration on websites and in emails:
If you use the “Elementor” page builder on your WordPress website, you can easily integrate your Calendly calendar on your WordPress website: Edit a page with Elementor and select “HTML” as the element. Go to the Calendly dashboard, select your calendar, click share, then click add to site. Copy and paste the HTML code into the Elementor “HTML” element. Save the page and your Calendly calendar will appear.
With a Calendly integration on the website or in emails, you can generate leads – i.e. potential customers. They can choose appointments in the time windows you specify, enter their telephone number and you can use it to conduct highly qualified consultations. In addition, users receive automatic reminder emails, and you can also have automatic reminder SMS sent in the paid version. This ensures that the appointment appearance rate at Calendly is over 95% according to my experience. You can also import Calendly leads into a CRM such as HubSpot, Zendesk, ActiveCampaign, or Propstack with Zapier, or connect to a mailfunnel with Mailchimp.
You can use the “Compliance” WordPress plugin in the Script Center to enter and save Calendly’s URL so that Calendly’s data retrieval is blocked before the cookie banner is approved. According to the GDPR, a user may only be tracked by third parties if they have explicitly consented to data processing. If the user has opted out of third-party data processing, they must not be tracked – and Calendly must not record the user data either. With the data protection plugin “Compliance” you can install so-called placeholders for this case: In the case of rejection, the user sees an area with a button instead of the Calendly calendar, with which the user can agree to the data processing in order to see the Calendly calendar.
Yes, the free Calendly version is already sufficient to generate leads on websites and in emails. Users can register with you for consultation appointments, which you can use to attract new customers. This allows you to integrate your calendar into websites and e-mails, have automated reminder e-mails sent so that your applicants appear, and query telephone numbers. The paid version, on the other hand, allows you to send additional reminder SMS to registrants, integrate your registrants with a CRM such as HubSpot with Zapier so you can connect registrants to a mailing funnel, create multiple calendars, and the forwarding of users to a thank you page for conversion tracking after registration,
You might also be interested in:
Track phone number redirects from Google Ads campaigns
With Google Tag Manager you can install phone number forwarding for Google Ads campaigns on your website.
Create reports with Data Exploration in Google Analytics 4
Many report views that were preconfigured in Google Analytics 3 must be manually created in Google Analytics 4.