HubSpot setup on WordPress websites: Basic implementation for lead generation
If you want to stay in touch with your customers but don’t have a CRM yet, you can get started with HubSpot’s free entry-level version. In this guide you will learn how to integrate HubSpot into websites with WordPress as the CMS.
HubSpot is now also available for beginners in the most important basic functions either free of charge or at a low monthly price. HubSpot is an efficient and high-performance CRM (Customer Relationship Management) system that enables companies to communicate, collaborate and contract with customers efficiently and bundled under one roof. Above all, however, companies can use HubSpot to analyze their customers, send them emails based on their website usage behavior, create landing pages for target groups and feed back customer data to advertising systems (Google Ads, LinkedIn Ads, Facebook Ads) so that they can use algorithmic learning to find more similar users in the can find network.
With HubSpot you can determine the cost per deal from advertising campaigns
In other words, HubSpot is essential for lead generation and accurately targeted marketing. With HubSpot, you can sync your accounts for Google Ads, Facebook Ads, and LinkedIn Ads, so you can assign each lead won to exactly one ad campaign and date – which allows you to determine an exact cost per deal from each ad campaign.
HubSpot also lets you export conversion values to Google Ads, LinkedIn Ads, and Facebook Ads
One thing that’s becoming increasingly important in online marketing: you can use HubSpot to export your contacts that turned into customers and came from ad campaigns to the Google Ads, Facebook Ads, and LinkedIn Ads advertising networks . This allows the advertising systems to maximize the value of your conversions with algorithmic learning by finding more users on the web who are similar to those who have already converted. Ergo: Instead of maximizing your leads, you can start maximizing your deals.
With HubSpot you can set up lead scoring for your contacts
The strength of HubSpot also lies in the fact that it guarantees comprehensive user tracking that goes beyond the boundaries of the actual website : You receive the data of every website visit, every clicked e-mail, every completed contact form and every clicked ad for every contact at profile level from Google Ads, Facebook Ads and LinkedIn Ads. This allows you to see exactly the customer journey of your contact and quickly find out: The more touchpoints your contact had with your company, the more interested and qualified he is. You can use this for your sales by setting up a so-called lead scoring . This is a points system: A completed contact form receives a higher score than a website visit. A specific characteristic (such as company size in the B2B area) can also have its own score value. If you assign a score value to each touchpoint with your content and your advertising channels, you can see at a glance which of your contacts has interacted the most with your company – and thus (assumed) has the highest qualification. This allows your sales department to see immediately which lead is particularly suitable forto be contacted. In addition, for each contact, your sales department can see which content the potential customer has already interacted with and can therefore closely link it up in the conversation. A completely different template than starting with a general and generic sales script, because here a common content reference can already be used for the conversation.
HubSpot lets you set lifecycle stages for your leads - for Marketing Qualified Leads (MQLs) and Sales Qualified Leads (SQLs)
Additionally, you can categorize your leads into multiple funnel stages, such as Marketing Qualified Lead (MQL) , Sales Qualified Lead (SQL), and Opportunity. Based on the values of the HubSpot lead scoring, you can build in a marketing automation here and ensure that leads rise to the next level above a certain score threshold. You can then evaluate these so-called lifecycle stages, calculate cost points from your advertisements for reaching these lifecycle stages and make it easier for your sales team to select the most qualified contacts.
Instructions: How to install HubSpot on your WordPress website and sync contact forms
Step 1 - First create a free HubSpot account
If you want to use HubSpot for your lead generation, first create a free HubSpot account . In the basic version, this already has many exciting and very important functions. Important here: You can already collect unlimited contact entries with the free HubSpot account. There is one important nuance, though: HubSpot differentiates between general CRM contacts and marketing contacts . The number of contacts that you can use directly with HubSpot for marketing activities (such as sending emails) is limited accordingly in the free version.However, you can use Zapier to connect your HubSpot account to Mailchimp, for example, and use this detour to send emails to the customer database. If you want more HubSpot features, you can always upgrade later and check out HubSpot ‘s pricing.
Step 2 - Install HubSpot tracking code on your WordPress website
In order for HubSpot to record the user behavior of your contacts on your WordPress website, you should install the HubSpot tracking code. You can find this in the HubSpot dashboard by clicking on the gear icon in the top right menu (Settings) and then clicking on the Tracking Code menu item in the left menu bar.
Copy the HubSpot tracking code to then install it on your WordPress website.
Integrate tracking code
Install HubSpot ‘s tracking code before the closing </body> tag of your website. The easiest way is to use the Head, Footer and Post Injections WordPress plugin , which allows you to easily and conveniently integrate tracking codes in the right places on your WordPress website.
Install the HubSpot tracking code on your WordPress site with the Head, Footer and Post Injections plugin before the closing <body> tag.
Data protection compliant implementation
It is also important that the HubSpot tracking code is installed in compliance with data protection regulations . In other words: HubSpot must not start recording the behavior of an online user before they have given their consent to the data processing in the cookie banner. Therefore, the HubSpot script must be blocked until consent to data processing . You can install this safely and reliably on WordPress websites with the free data protection plugin Complianz . You should also include the use of HubSpot on your website in the privacy policyso that users know that by consenting to data processing, they also consent to data processing with HubSpot. To do this, write the name and address of the service, as well as the purpose and the possibility of data deletion in a corresponding paragraph of your data protection declaration.
Step 3 - Sync contact forms with HubSpot: HubSpot integration for Contact Form 7
Now the contact forms have to be synchronized with HubSpot so that the incoming contact requests also arrive in HubSpot. If you’re using the Contact Form 7 plugin for your WordPress website contact forms, there’s a free add-on that can be used to sync the contact forms to HubSpot.
After installation, you should go into the plugin settings and click on the “Accounts” menu tab. There you can connect your HubSpot account to Contact Form 7.
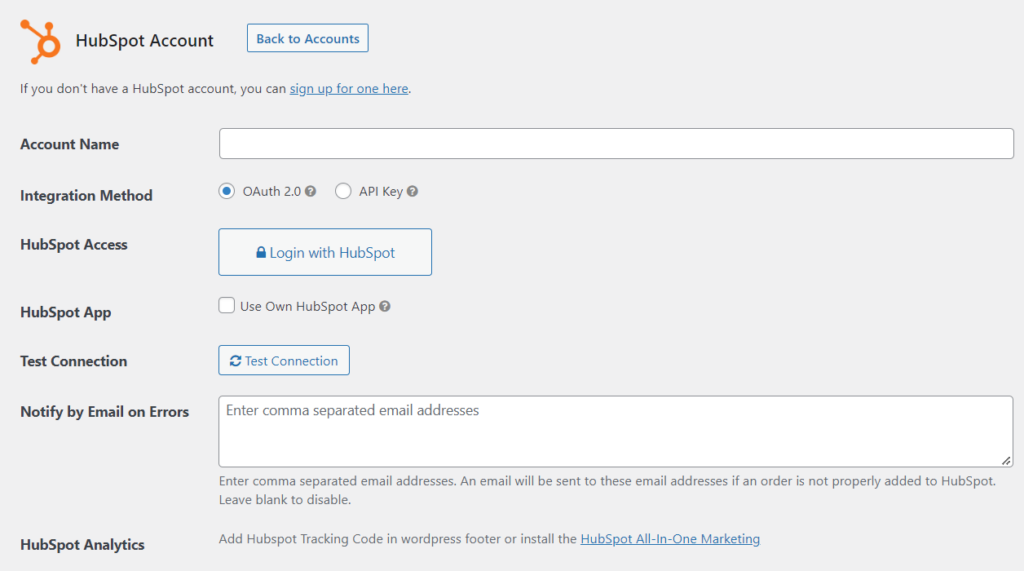
Establish the connection between your contact form plugin (in this case: Contact Form 7) and your HubSpot account.
Then go to the “Feeds” tab and create a HubSpot feed for each of your contact forms. The HubSpot feed specifies which of your custom form fields should go into which HubSpot property. Store here that the form entries should be recorded as contacts.
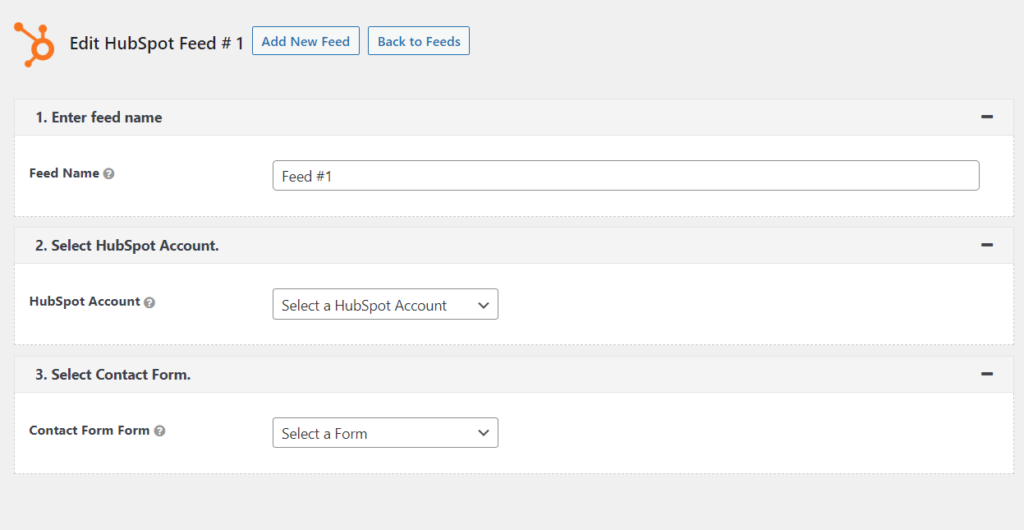
For each of your contact forms, create a HubSpot feed with the linking of your contact form inputs to the associated HubSpot properties so that the data from the contact form is transferred to HubSpot.
Step 4 - Sync other contact form apps to HubSpot
If you use another contact form environment on your WordPress website, you can usually find the appropriate add-ons there to connect it to HubSpot (if they are common contact form plugins):
Step 5 - Create a lead sync for your HubSpot leads from Google Ads, LinkedIn Ads, and Facebook Ads lead forms
If you run ads on Google Ads, Facebook Ads, or LinkedIn Ads, you should connect your ad accounts to HubSpot. In the free HubSpot account, you can connect up to two accounts at the same time. This allows you to match every click on every ad to an exact contact record in your CRM database.
If you also generate leads with lead forms in Google Ads, Facebook Ads or LinkedIn Ads, you would also have to create a so-called lead sync, i.e. a lead synchronization. The leads gained from the advertising platforms are then automatically imported into HubSpot as contacts.
Finished! Now you have a good first basis for using HubSpot as a CRM and for your lead generation work. Further integrations, such as leads from budget configurations, Calendly entries or appointment planners would have to be connected to HubSpot with Zapier, as these are not recorded by the tracking code on the website or the contact form.
HubSpot Setup: WordPress
If you have any questions regarding this blog article, feel free to ask:
Ask your question
info@slavawagner.de
Overview
- With HubSpot you can determine the cost per deal from advertising campaigns
- HubSpot also lets you export conversion values to Google Ads, LinkedIn Ads, and Facebook Ads
- With HubSpot you can set up lead scoring for your contacts
- HubSpot allows you to set lifecycle stages for your leads
- Instructions: HubSpot setup
- Step 1 - First create a free HubSpot account
- Step 2 - Install HubSpot tracking code on your WordPress website
- Step 3 - Sync contact forms with HubSpot: HubSpot integration for Contact Form 7
- Step 4 - Sync other contact form apps to HubSpot
- Step 5 - Create a lead sync for your HubSpot leads from Google Ads, LinkedIn Ads, and Facebook Ads lead forms
HubSpot installation on WordPress
- Create a free HubSpot account and integrate the tracking code into your WordPress website.
- Connect your WordPress contact forms from Contact Form 7 or WPForms via the respective HubSpot add-on.
- Enable HubSpot’s Lead Syncing to sync any of your Google Ads, Facebook Ads, or LinkedIn Ads ad accounts to HubSpot.
Ask your question
info@slavawagner.de
Overview: HubSpot setup for WordPress websites with Contact Form 7 and WPForms
HubSpot is popular marketing automation and CRM software that helps businesses streamline their online marketing and sales strategies. When it comes to lead generation, you can get started on WordPress websites with a simple HubSpot setup and a free HubSpot account.
All you have to do is paste the HubSpot tracking code into your WordPress website and connect your contact forms to HubSpot. This is particularly easy with Contact Form 7 or WPForms, as these WordPress contact form plugins have add-ons that allow connection to HubSpot. This is used to send copies of the contact forms submitted to HubSpot and to transmit the event data to HubSpot. This allows you to see exactly what original acquisition source your lead came from in HubSpot.
FAQ - Summary of the HubSpot setup
Here is a summary of important and frequently asked questions about the HubSpot setup:
For a simple HubSpot setup on a WordPress website, you can create a free HubSpot account and then integrate the HubSpot tracking code on your WordPress website. You should then link your contact forms to HubSpot in the lead generation area. If you use the contact form plugin Contact Form 7 or WPForms, there are plugins that enable the data transfer of the submissions to HubSpot so that the contacts automatically enter the HubSpot CRM.
With a HubSpot setup on your website, you can see what your contacts are doing in the CRM on the website, which website URL they visited when, which ad click from advertising campaigns from which campaign they made and which offers they signed up for via the contact forms.
A simple HubSpot setup allows you to track your contacts’ original acquisition source in HubSpot. This allows you to see at a glance which contact comes from paid search engine or social media advertising. You can also filter contacts based on which campaign each contact came from. As soon as one of the contacts becomes a customer, you can label this contact as a customer and then calculate how high your cost point is per deal from your advertising campaigns.
Yes, it’s very simple: Contact Form 7 or WPForms have add-ons that allow the parallel import of the contact form submissions to HubSpot and transmit the submitter’s event data. Such event data can be, for example, the original source of acquisition, such as organic traffic from search engines or from paid advertising.
You might also be interested in:
Track phone number redirects from Google Ads campaigns
With Google Tag Manager you can install phone number forwarding for Google Ads campaigns on your website.
Create reports with Data Exploration in Google Analytics 4
Many report views that were preconfigured in Google Analytics 3 must be manually created in Google Analytics 4.