HubSpot lead syncing for lead forms from Google Ads, LinkedIn Ads, and Facebook Ads
This guide is useful for companies that don’t use CRM but still want to receive leads from lead forms via email. You can do this with the free versions of HubSpot and Zapier. So you don’t have to manually download the contact details from the advertising platforms every time.
Anyone who collects leads with lead forms on Google Ads, LinkedIn Ads and Facebook Ads, but does not have a CRM, must download the contact request data manually as a CSV. This is inconvenient in a number of ways, with no leads coming in some days and a handful on others. So you have to keep track of the manual download of contact data from lead forms every day, and for every campaign that you manage. As a rule, this means that advertisers prefer to download the current contact details of the leads every few days and send them to sales instead of every day. This, in turn, leads to inconsistent processing times: If a lead is downloaded that registered four days ago and you only then forward its data, sales then need an additional few days until processing is scheduled. In industries where a fast response time after the inquiry is important, this can mean that the applicants in the lead forms have either lost interest by the time the call is made or no longer know what it is about.
What are lead forms in Google Ads, LinkedIn Ads and Facebook Ads?
Lead forms are platform-internal contact forms for Google Ads, LinkedIn Ads and Facebook Ads, which the user accesses by clicking on the advertisement. They are characterized by the fact that most of the relevant information is provided by an auto-fill-in. With LinkedIn and Facebook, the stored telephone number of the user account can be imported automatically in this way, as well as the e-mail address. With LinkedIn, the job title, company name, industry and company size can be automatically entered via auto-fill-in. With Google, a smartphone user would need to be signed in with the Youtube app, and if they are presented with a lead form under a Youtube video, Google will automatically import their smartphone phone number and email address. In addition, lead forms have very high conversion rates because they are easy to use and it is very easy to submit a form with two clicks.
The contact details and entries of the leads are always stored internally in the system and there will be no automated e-mail dispatch to the advertiser as of 2022. The data can only be downloaded – for example in CSV format. Not only impractical for interlocking with sales, but also for connecting to mailing systems for automated mail chains. Companies that do not use a CRM system (system for customer relationship management) accordingly have difficulties in processing leads from lead forms.
With the free versions of HubSpot and Zapier, you can have the data sent to you automatically by email – whenever a new lead comes in. In addition, the leads can be connected directly to Mailchimp or similar mailing systems so that the leads receive a mail chain.
HubSpot's free account
HubSpot is a high-performance CRM that you can connect a huge range of platforms to manage directly in HubSpot. HubSpot has a very strong and reliable lead syncing feature for synchronizing and preparing leads – this allows you to easily import leads from lead forms from Google Ads, LinkedIn Ads and Facebook Ads in real time and fully automatically. In the free HubSpot version, you can connect up to two platforms at the same time.
If you have multiple campaigns on an advertising platform, you can create up to five lists in HubSpot in the free version. Each list is characterized by the fact that the leads enter it according to specified classification criteria. The standard classification criterion for lead forms is Formulareinsendungen (German designation) or Form Submissions (English designation). In each list you simply enter the form name that you use in the respective advertising system and then all synchronized leads from this lead form are stored in the list. In the second step, the list is used to set up automated mailing with the data or to connect it directly to Mailchimp and other mailing systems.
Step 1 - Link ad account to HubSpot
The first thing we need to do is set up lead syncing, i.e. syncing the leads from our lead forms. With HubSpot, we can segment them according to campaigns, prepare them in lists and finally connect these lists to mailing systems or plan mailing. To set up lead syncing, you always need the respective admin access rights for Google Ads, LinkedIn Ads or Facebook Ads. Once you’ve set up your free HubSpot account, setting up lead syncing is easy:
- Click on the gear icon at the top of the menu bar
- Then click on Marketing in the left menu bar at the bottom and then on Ads below it
- Then click the Link Account button
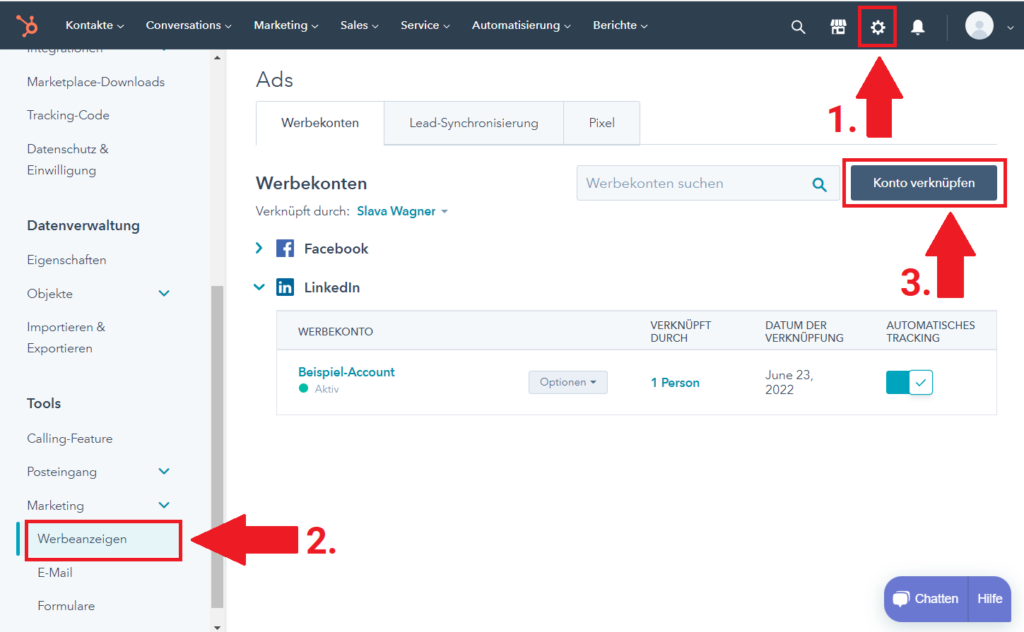
Open the HubSpot Ads module settings.
Select the advertising system here that you use to generate leads via lead forms. Then link the account.
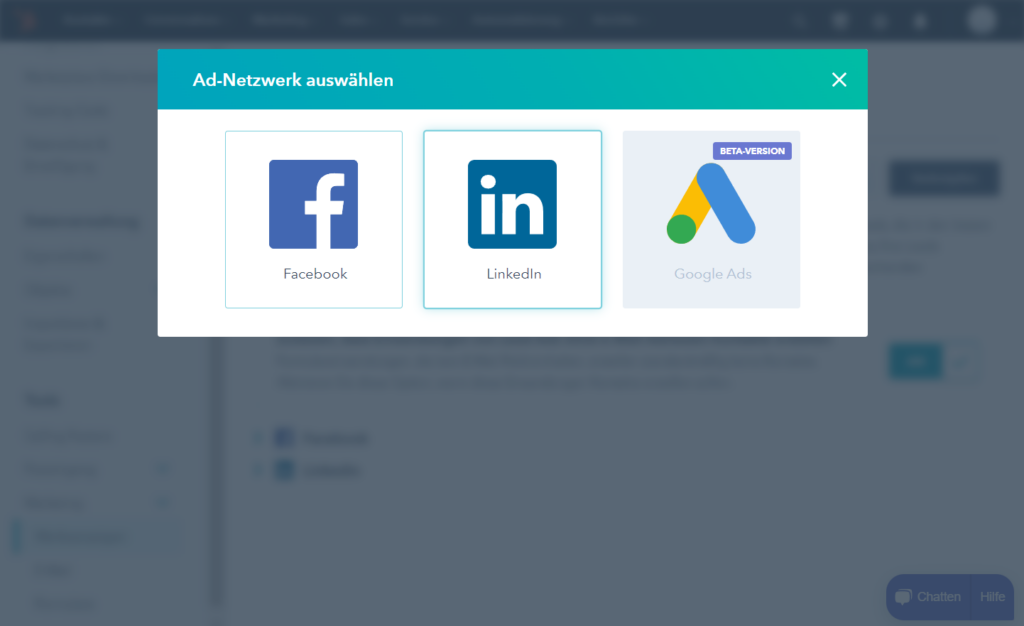
Choose an ad network to connect to HubSpot.
Step 2 - Set up lead syncing with HubSpot
Almost there: You have now linked your respective account to HubSpot. However, lead syncing still needs to be enabled for HubSpot to automatically receive all leads. Now click on the second tab at the top: Lead Syncing. Then click on Link above, select your advertising system (ad network) and activate lead syncing.
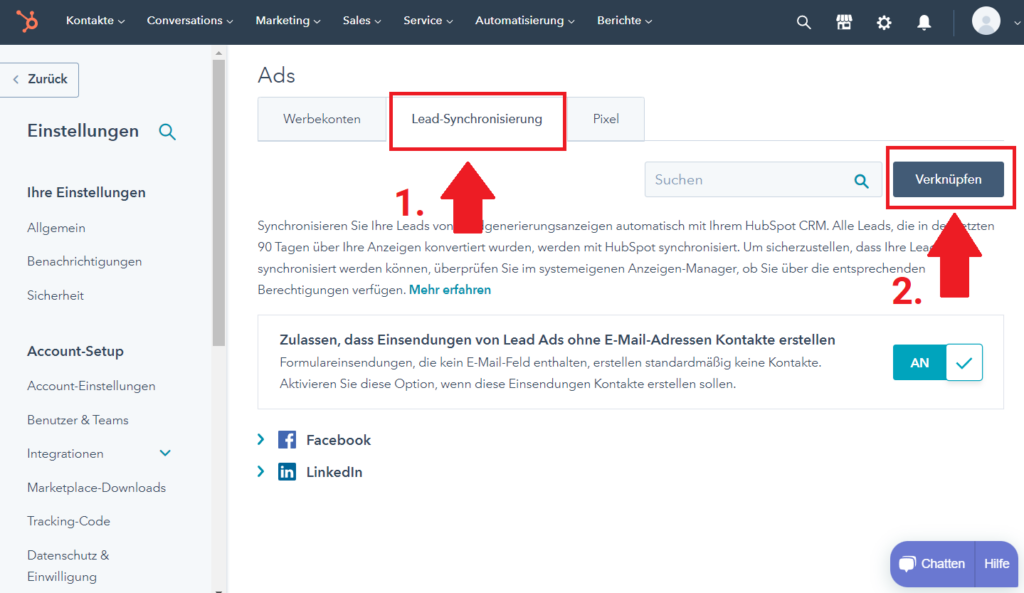
Connect ad network in HubSpot’s lead syncing.
Step 3 - Create lists in HubSpot
Now the lists have to be created, based on which the mail is to be sent or the connection to a mail chain is to take place. If you have one of the paid versions of HubSpot, you can create an email delivery or chain directly. But since this is about free lead syncing with HubSpot and Zapier, we only need regular lists. To do this, click Contacts in the top menu bar and then click Lists in the drop-down menu. Once you are in the list view, click the Create List button in the top right corner.
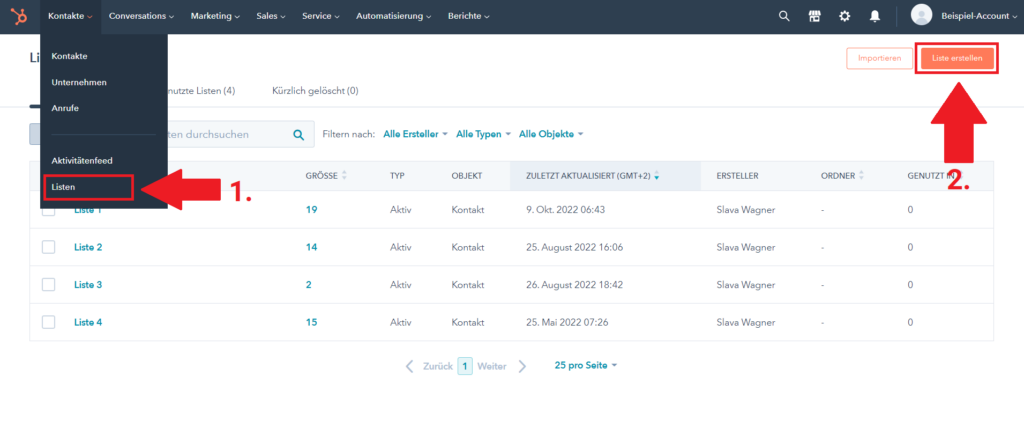
Create a new list in HubSpot to pre-sort leads from lead forms for later mailing or connection to Mailchimp.
Now give the list a name (e.g. the name of the campaign from your advertising platform or your lead form) and keep the setting Contact-based on the left. Also, below What kind of list do you want to create? keep active list ticked. An active list collects users in real time from lead syncing. Then click Next.
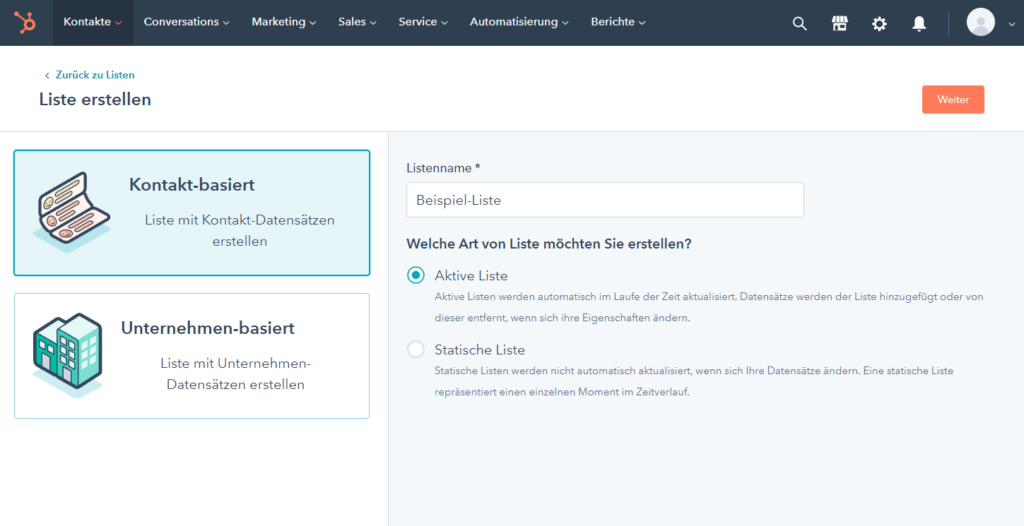
Create contact-based, active lists: This ensures that new leads from lead syncing are automatically imported in real time.
Now only the filters for the list are missing, so that the leads from a certain campaign automatically flow into the list. Creates a new filter and selects Formulareinsendungen (German voice output) or Form Submissions (English voice output).
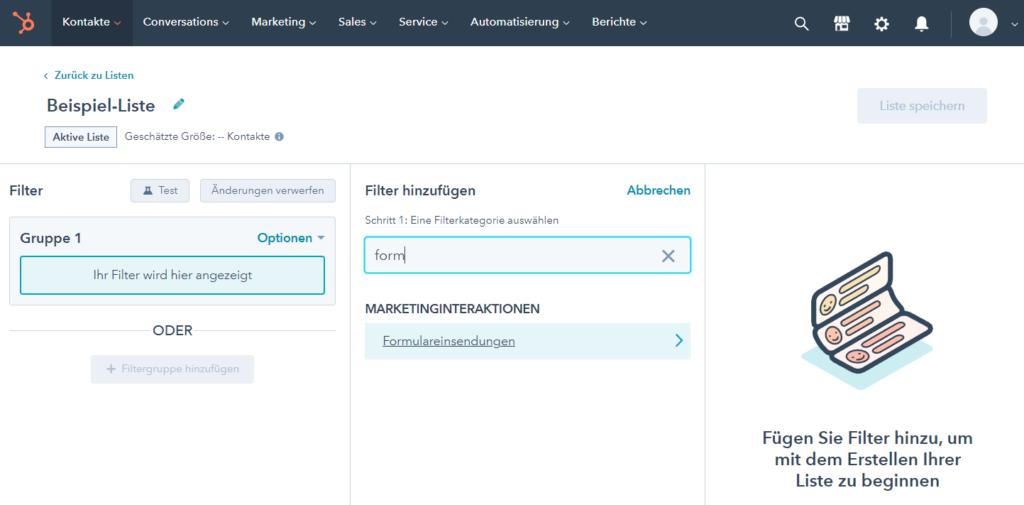
Creates a filter with form submissions as an ordering criterion. Select either your specific lead form (needs to be synced beforehand and this can take a few hours from form creation to syncing) or multiple lead forms or All form submissions if all your lead forms are about the same submission subject anyway.
Now enter the name (i.e. the exact description) of your lead form or search for it in the drop-down menu. Warning: HubSpot typically takes a few hours to recognize and display a lead form on an advertising system (Google, LinkedIn, Facebook). If the lead form doesn’t appear in the dropdown menu yet, you’ll need to wait and try again later.
If your current campaigns always have the same subject and signup subject (for example, signing up for the same consultation or service over and over again), you can simply select the Any form submission option. Then all the synced leads from lead forms will be sorted in the list and in the second step you can receive automatic mail notifications for these leads, send them automatic welcome emails or double opt-in emails and connect them to a mail chain.
As soon as the filters have been selected, HubSpot will show a preview of the imported leads in the active list after a while. Then click on the Save button at the top right.
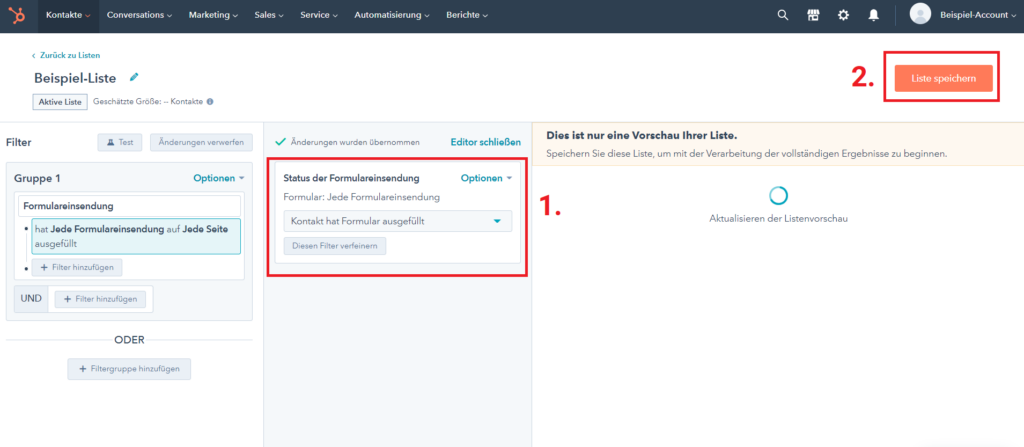
When you have finalized your filter, click Save List in the top right.
Step 4 - Set up a Zapier account
Zapier is a leading application in the field of data connectors and connection between API interfaces. The free version has a HubSpot connector that can be used to send mail based on the HubSpot lists – or to connect to Mailchimp, other CRM systems such as Propstack, ActiveCampaign and many more. In the free basic version, up to five Zaps (i.e. data connections) can be activated at the same time, which is sufficient for our up to five free HubSpot lists.
Let’s start with the configuration of the mail dispatch. You can use it to conveniently have all contact data and information from the lead forms sent to you by e-mail every time a new lead comes in. You can also have them sent to the sales email addresses or to the department responsible for processing the requests.
Sign up for a free account, then click Create Zap in the top left of the dashboard.
Step 5 - Set Zapier triggers
In the first step, Zapier asks us what the trigger should be for our mail delivery. The trigger here is our one or each HubSpot list. To do this, we first need to locate the application that will host our trigger: in this case, HubSpot. Then go on to the next step.
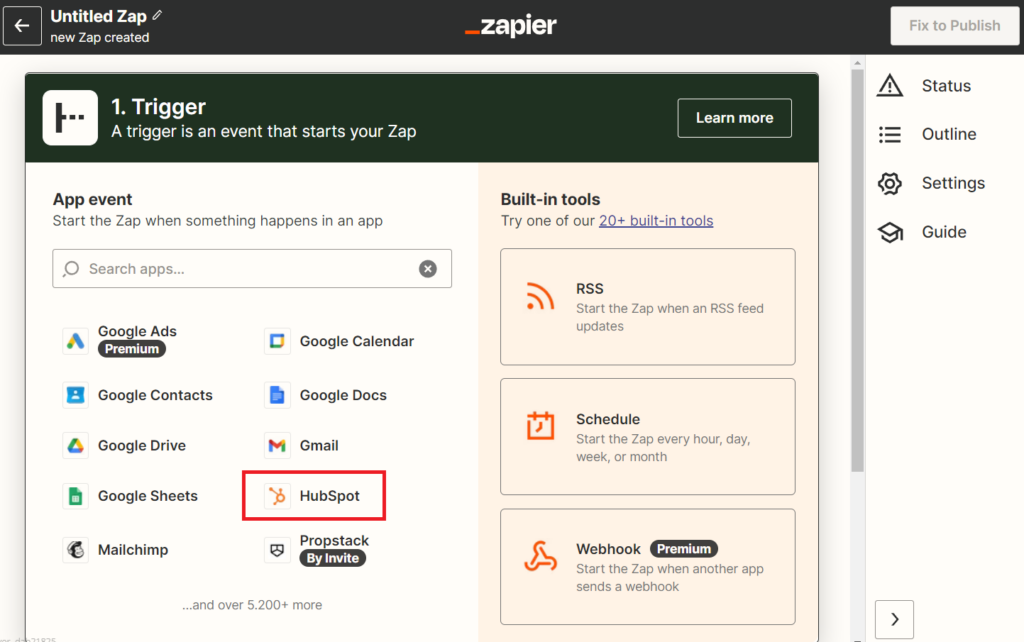
Under App Event, select the HubSpot application after clicking Create Zap in the top left of the main dashboard.
The event that should trigger an email dispatch is a new list entry in a specific HubSpot list. Select New Contact in List at Event. Then click on Continue.
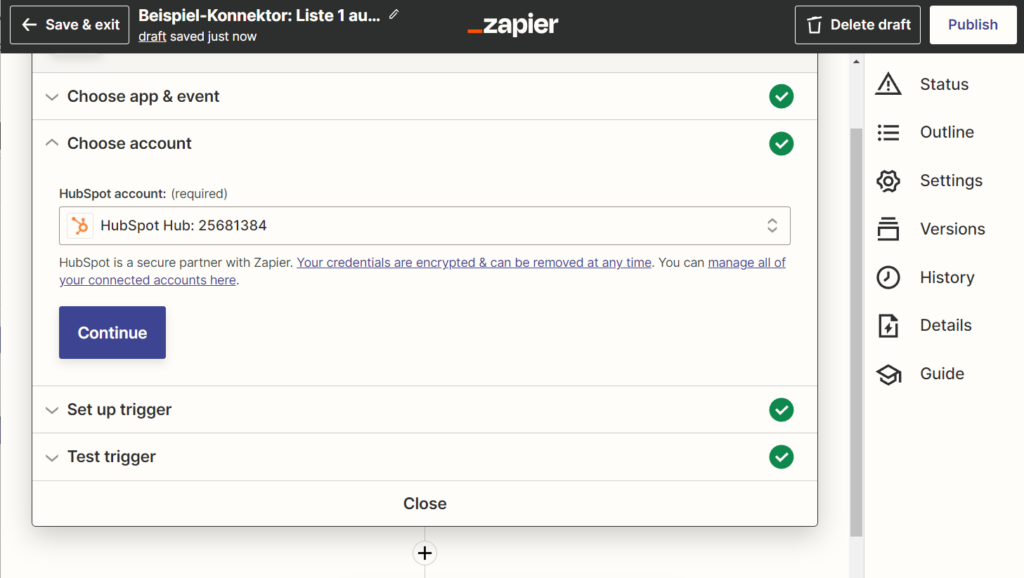
Select your HubSpot account and authorize the connection to your HubSpot account.
Now select the HubSpot list for whose leads you want to set up automated emails to be sent to you.
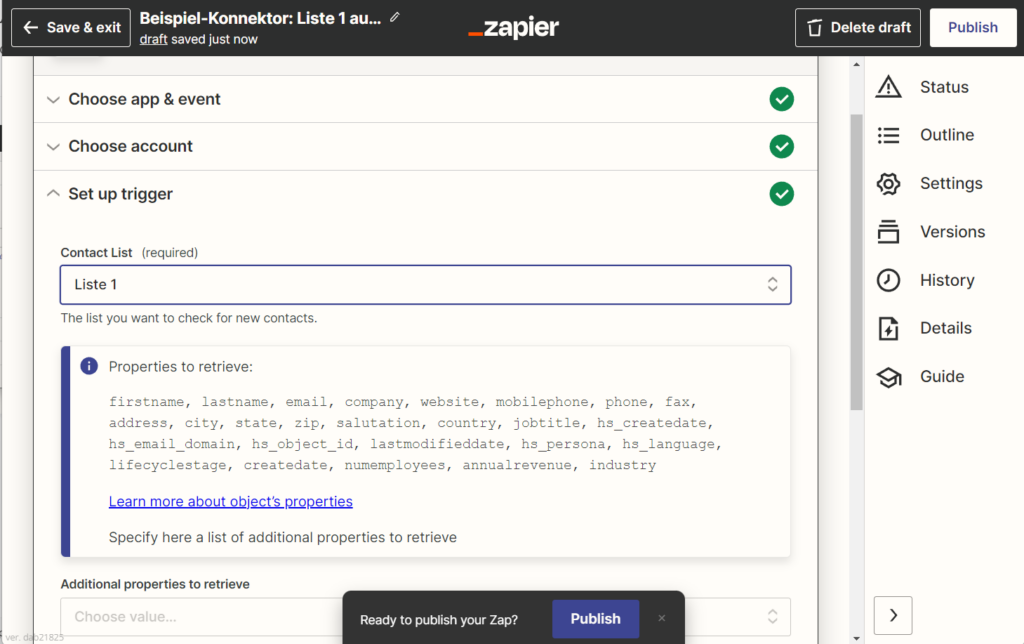
Select the appropriate HubSpot list you created earlier.
The most important data is already automatically pulled from HubSpot, such as first name, last name, email address and telephone number. However, if you have requested additional information in the lead form, you can add the data import individually in the Additional properties to retrieve field below. Such data can be: Manual form fields for single-line text, a company size from LinkedIn or Facebook, a company name or a job title.
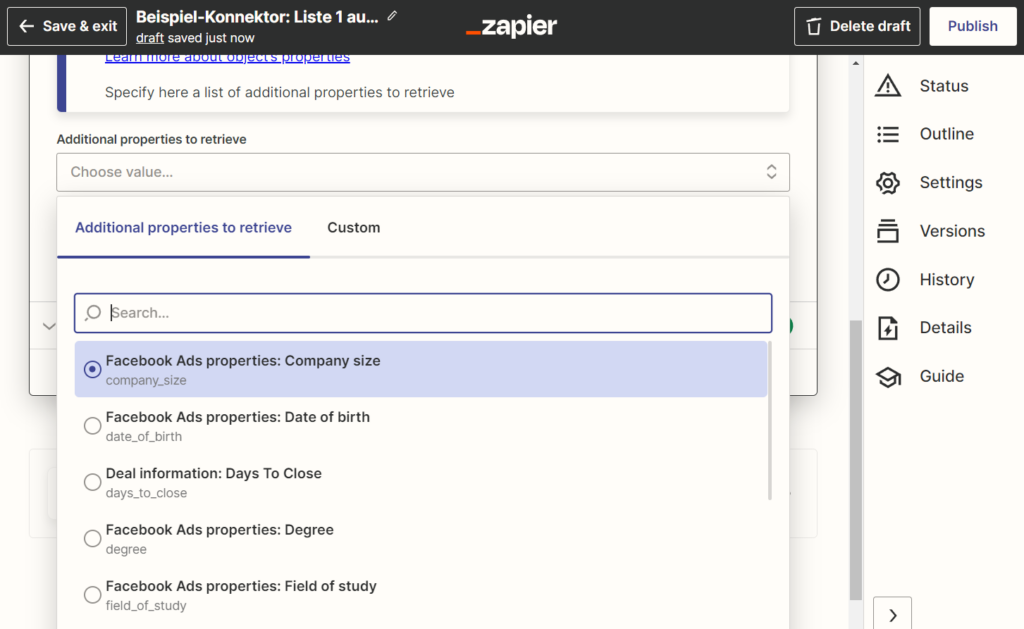
If you want or need it, you can get more HubSpot properties in the data transfer. You can then set these as dynamic fields in the notification emails, so that the emails that go to sales dynamically feed in and transmit this data for each lead.
In the next step click on Test Trigger and then on Continue. Note: Sometimes the test fails even though the trigger and the entire zap work. The best way to check the functionality of the data connection is to simply check whether an e-mail actually arrives in your inbox afterwards.
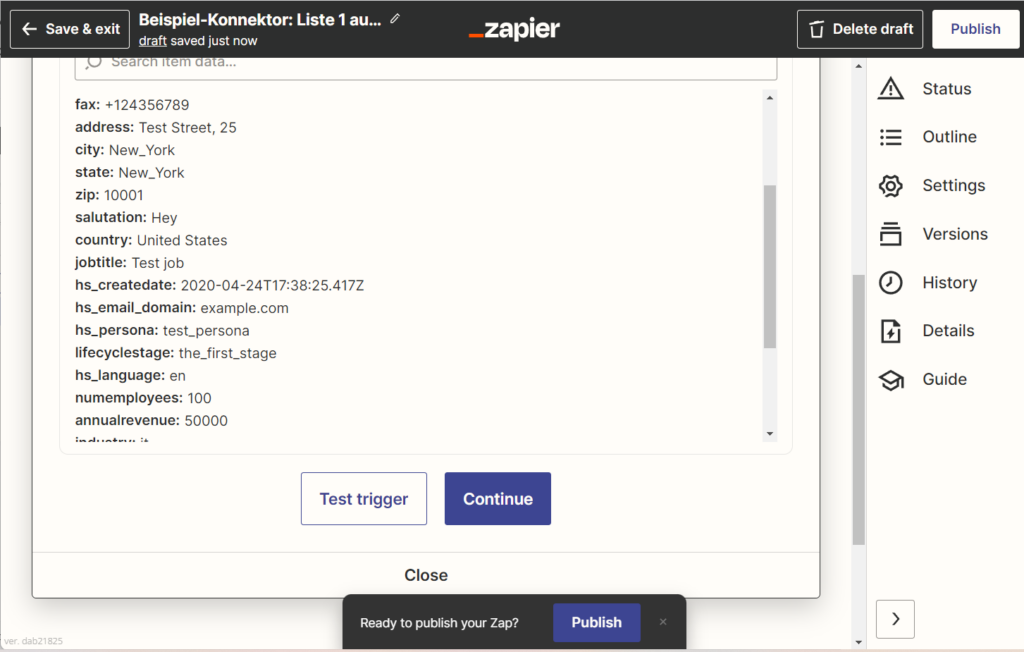
Test the Zapier trigger or skips the test if the trigger is not working – correctly or incorrectly.
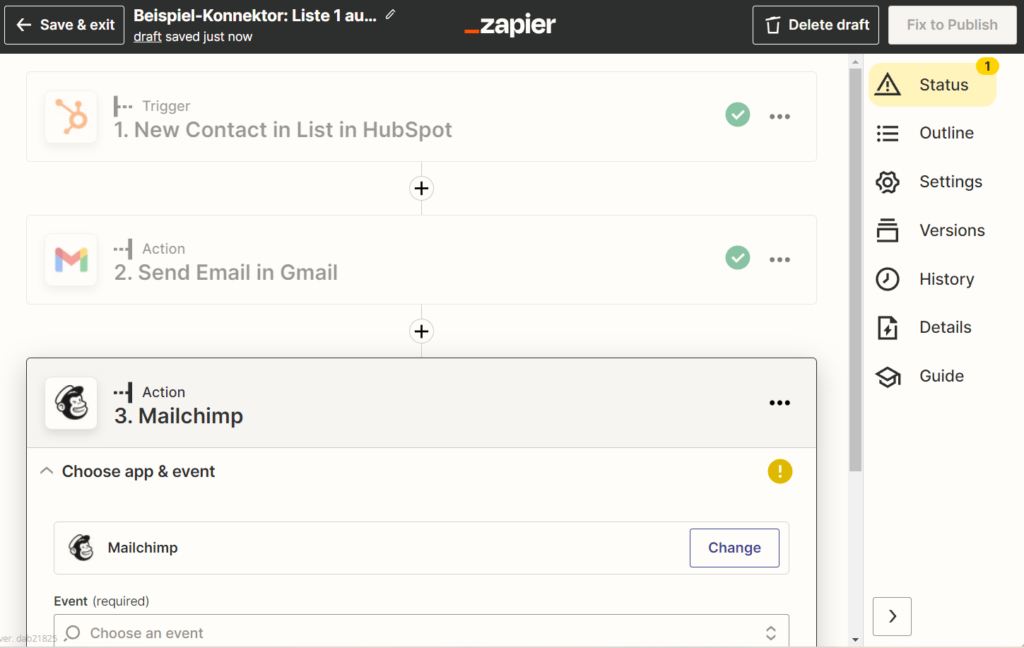
Step 6 - Set Zapier Action
Now Zapier should send an email based on each new list entry in HubSpot. Select a mail system here – for example Gmail. Use Send Mail as an event, since the system is supposed to send mails.
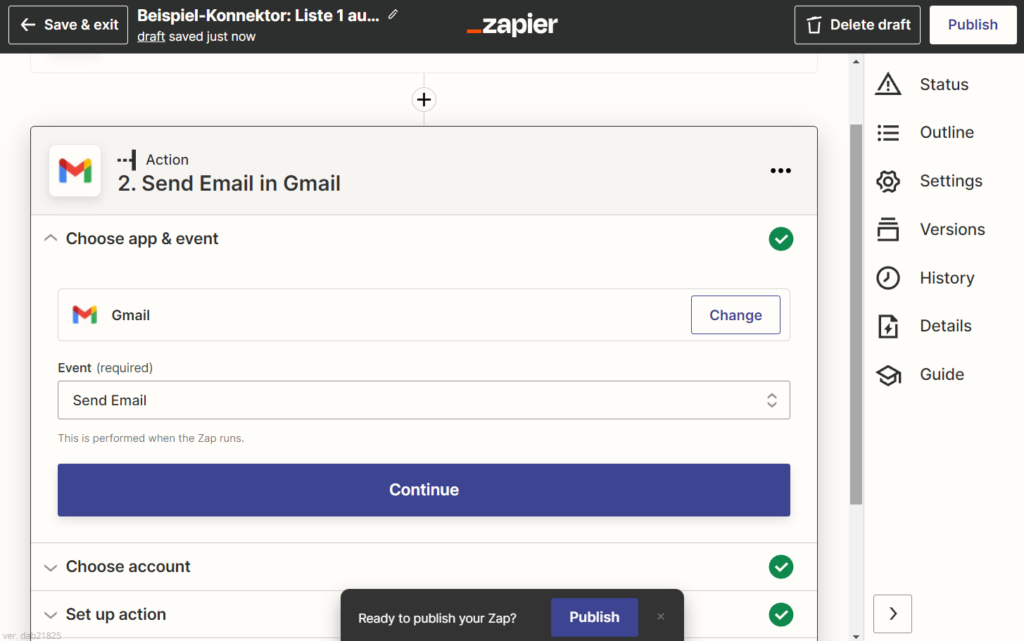
Select the Send Email event.
Now select your respective Gmail account. I like to create a central Gmail account for each company with a unique name, in the style of unternehmen-xy-ads.zentral[at]gmail.com. Connect your Gmail account and then click Continue.

Select your Gmail account and authorize the connection to Zapier.
Now write the subject, the e-mail recipient and your alias (displayed name of the sending e-mail address) in the appropriate times. For Body Type you should select plain. The body is the text content that your recipients will see. Here you can select and store the form inputs that were pulled from HubSpot. These fields are dynamic (first name, last name, phone number, email address, city, job title, company name, company size), which means that the relevant contact details are added here for each lead received. Now create the text you want your recipients to see, add the dynamic HubSpot fields, which you can recognize by the HubSpot logo.
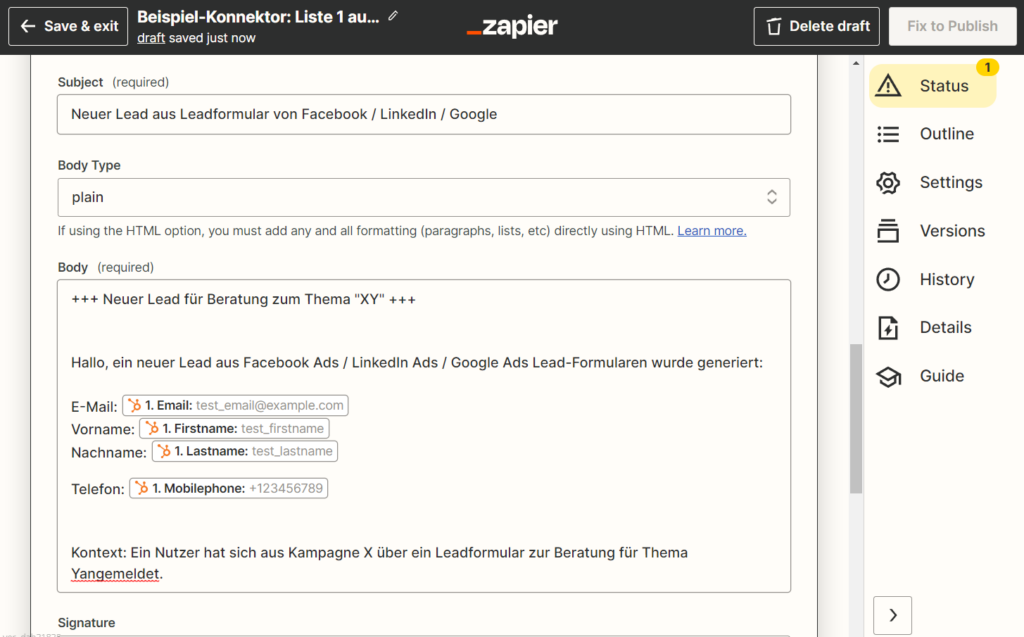
Specifies the recipients, as well as the sender alias, the subject. Then writes the email content and sets the dynamic form fields to hold the data for each new lead.
Just below that is another important field: Label/Mailbox. Here you should select INBOX so that the mails really end up in the inbox.
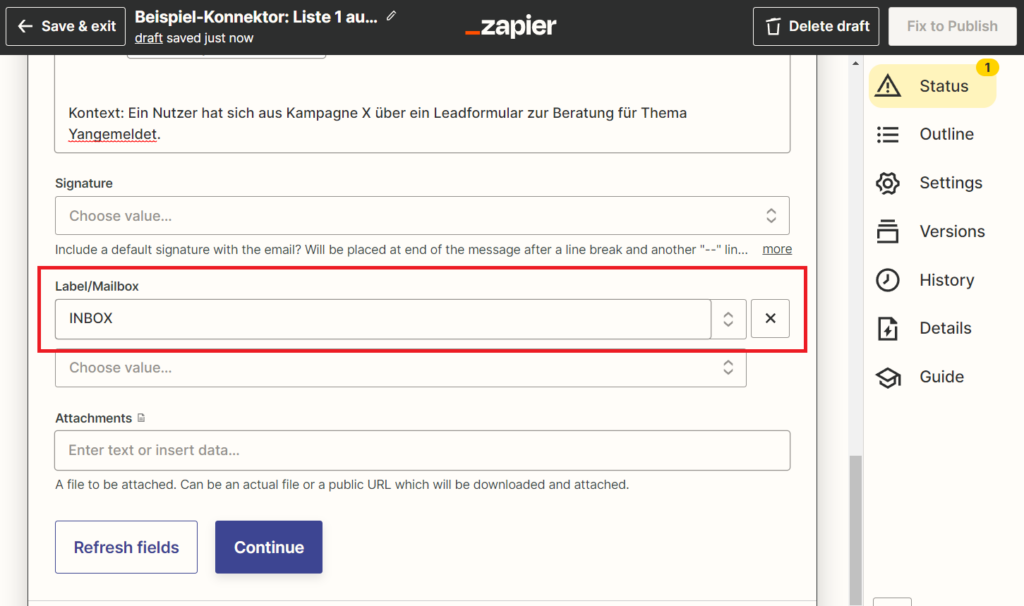
Select the INBOX option for Label/Mailbox so that the recipients receive the e-mail in the mailbox and not in the spam folder.
Done: Now you can test the functionality of the Zapier action, skip the test or publish the Zap directly, i.e. put it online. This configures the mail dispatch and you or your sales department will now receive an e-mail with all the input data of the lead for each newly registered lead from a lead form.
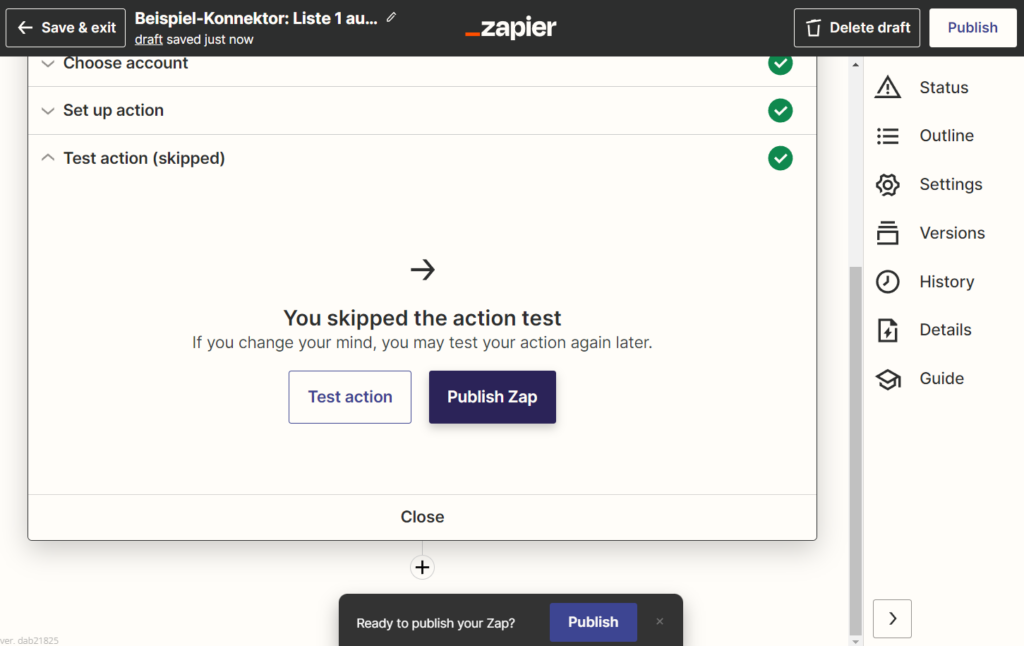
Test the zap or skip it if it doesn’t work. Publish the Zap and check in the mailbox whether the connection really works after a test input.
Step 7 - Mailchimp connection with Zapier (or other mailing system)
If you also want to feed the incoming leads from lead forms into a mail system with which you can send automated mail chains, you can also do this in the free Zapier account. Just click the plus icon under your Zapier action for Gmail and select Mailchimp as your application for another event.
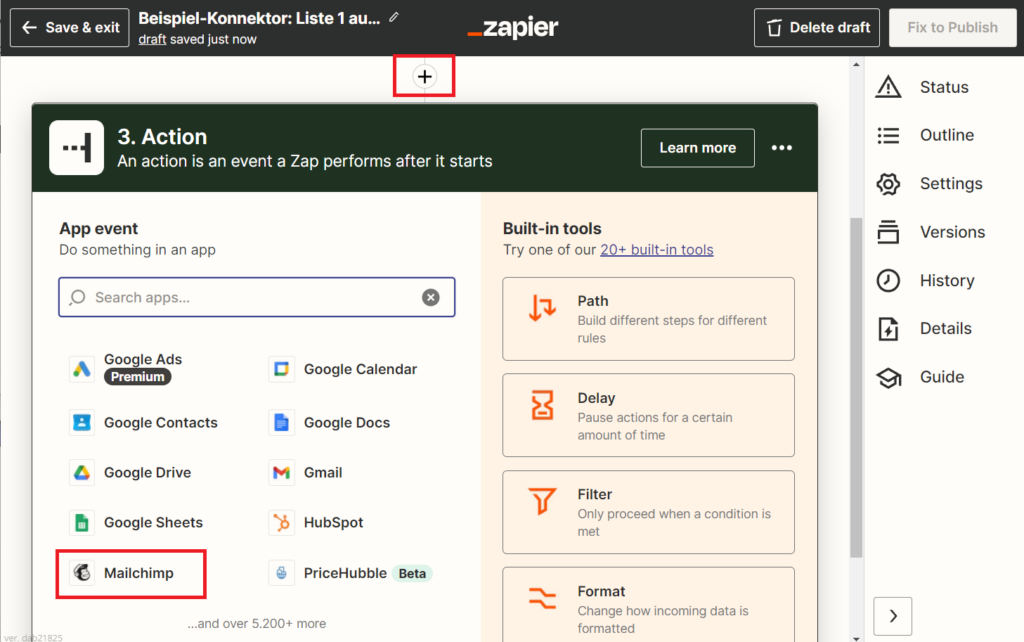
After connecting to Gmail, you can set an additional event in the same zap: namely the automatic feed of the lead data to Mailchimp. From there, the lead can be connected directly to a mail chain. Handy for companies that don’t use CRM.
Here you can now configure the connection of your lead to Mailchimp and link the account.
Select Mailchimp as the application and authorize the connection with Zapier.
In this way, data connections for the transfer of the lead forms can now be created for different advertising campaigns from LinkedIn Ads, Google Ads or Facebook Ads. If you have several campaigns or different registration objects for the leads, you would have to create different HubSpot lists accordingly, create a Zapier Zap for each list and add your own text there in the mail dispatch that informs the recipient or yourself about where the Lead came from, what campaign it came from and what it is signing up for. In addition, you can now connect users – based on campaigns – with Mailchimp to tailor-made mail chains on the respective topic.
HubSpot lead syncing
If you want to sync your lead forms from Google Ads, LinkedIn Ads, and Facebook Ads to HubSpot, you can use lead syncing. If you have any questions regarding this blog article, feel free to ask:
Ask your question
info@slavawagner.de
Overview
- What are lead forms in Google Ads, LinkedIn Ads and Facebook Ads?
- HubSpot's free account
- Step 1 - Link ad account to HubSpot
- Step 2 - Set up lead syncing with HubSpot
- Step 3 - Create lists in HubSpot
- Step 4 - Set up a Zapier account
- Step 5 - Set Zapier triggers
- Step 6 - Set Zapier Action
- Step 7 - Mailchimp connection with Zapier (or other mailing system)
Summary: HubSpot lead syncing
If you want to sync your lead forms from Google Ads, LinkedIn Ads, and Facebook Ads to HubSpot , you can use lead syncing.
This is also a useful feature if you’re not already using HubSpot as your CRM – and it’s already possible with the free version.
With HubSpot, you can sort your leads into lists and set up automatic email delivery to the responsible people in sales – with a free Zapier account and Gmail . In this way, the sales department is informed directly by e-mail for every new incoming lead from lead forms and immediately receives all relevant contact data. If you have any questions regarding this blog article, feel free to ask:
Ask your question
info@slavawagner.de
Summary: Lead Syncing with HubSpot
Lead syncing with HubSpot is a feature that allows businesses to automatically sync—ingest—the contact information they’ve collected from native Google Ads, LinkedIn Ads, and Facebook Ads lead forms with a HubSpot account. This allows you to use this customer data directly in your HubSpot account for marketing automation, for sending emails or for sales. It also allows you to track which lead became a deal, helping you determine your cost per deal for each campaign.
To use lead syncing with HubSpot, companies must first create a HubSpot account. Once the account is set up, you can implement lead syncing through HubSpot’s ad network settings. Another benefit of lead syncing with HubSpot is that it allows businesses to manage and update their contact information in real-time. This means businesses always have access to the latest and most up-to-date contact information, which in turn helps optimize their lead generation and customer nurturing strategies. It facilitates the data management process and helps companies optimize their lead generation and customer nurturing strategies as well as increase their conversion rate.
FAQ - Lead Syncing with HubSpot
Here is a summary of important and frequently asked questions about lead syncing with HubSpot:
A CRM (Customer Relationship Management) is a system for managing your customer relationships. This allows you to track the acquisition sources of your contacts, determine users who became contacts from paid advertising, calculate a cost per deal, set up mailing lists, use lead scoring, manage sales processes, manage contracts and check invoices.
Lead syncing at HubSpot is the process of merging leads from Google Ads, Facebook Ads, and LinkedIn Ads lead forms into HubSpot. This is so important because otherwise leads from lead forms can only be downloaded as CSV or Excel files in the advertising platforms. At HubSpot, the new leads can then be processed directly or connected to an email distribution list.
You can use HubSpot’s lead syncing to import your leads from Google Ads, Facebook Ads, and LinkedIn Ads lead forms directly to HubSpot to use the contacts for further marketing automation. In addition, you can easily determine a cost point per deal.
Connecting leads from Google Ads, Facebook Ads, and LinkedIn Ads lead forms to HubSpot is possible with the Lead Syncing feature. This means that all leads from lead forms are imported directly from the advertising systems into HubSpot as contacts. You can set up lead syncing in settings in HubSpot’s Ads module.
You might also be interested in:
Data scraping with Data Miner browser extension: Analyze social media channels
Data Miner is a browser extension that can scrape data from website interfaces.
Youtube SEO with TubeBuddy and Ahrefs: Optimize descriptions, titles and tags
Keywords with search volume data are not only available for organic Google searches, but also for YouTube keywords.